Unity 전체 링크
Cinemachine Tutorial
- (6) Blend List Camera로 자연스럽게 시야 변경하기
- (7) Blend List Camera 속성 및 설정 제어하기 (Control Blend List Attributes and Settings by Script)
- (8) 우선순위를 설정해서 카메라 전환하기
깃허브에서 코드 확인하기
블렌드리스트 카메라의 속성이나 전환을 스크립트로 제어해보자.
(이전 글에서는 수동으로 제어하였다.)
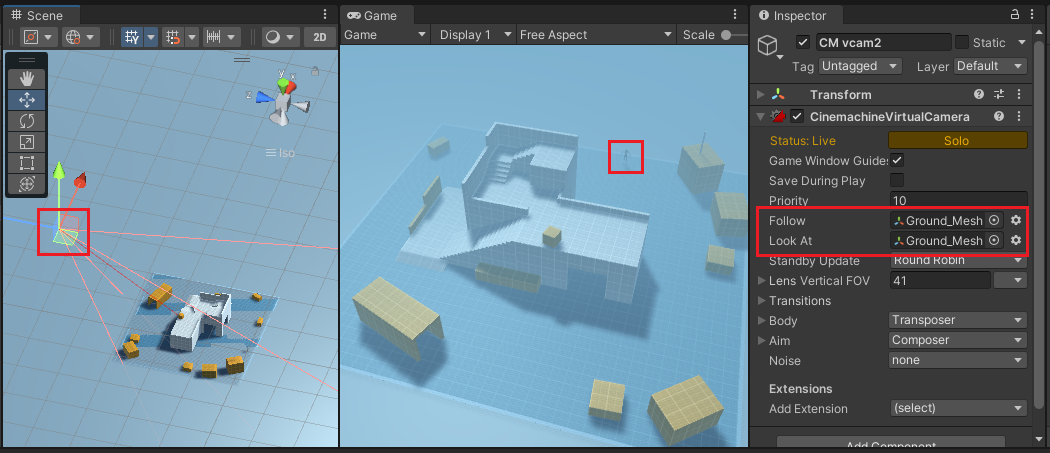
화면 전환을 위해 vCam1은 Player를 향하도록 설정하자.

vCam2는 Ground_Mesh를 Look At에 설정하여 전체 맵을 보이도록 설정하였다.
그리고 Canvas를 추가해 버튼을 만든다.
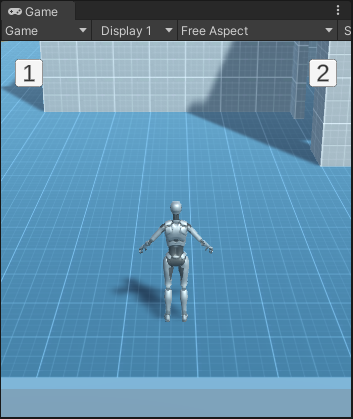
1번 버튼을 누르면 Player → Ground로 카메라가 이동하고,
2번 버튼을 누르면 Ground → Player로 카메라가 이동하도록 하자.
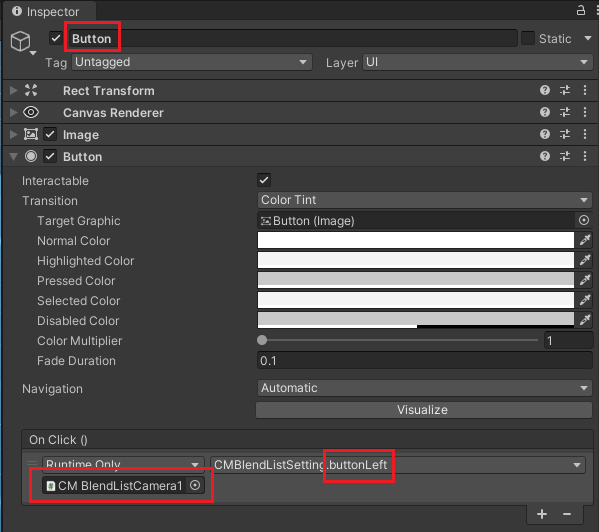
각 버튼에 스크립트의 buttonLeft와 buttonRight를 연결해주면 된다.
CMBlendListSetting.cs는 다음과 같다.
using System.Collections;
using System.Collections.Generic;
using UnityEngine;
using Cinemachine;

public class CMBlendListSetting : MonoBehaviour
{
    CinemachineBlendListCamera blendList;

    GameObject vCamObj1;
    GameObject vCamObj2;
    CinemachineVirtualCameraBase vCam1;
    CinemachineVirtualCameraBase vCam2;

    void Start()
    {
        blendList = this.GetComponent<CinemachineBlendListCamera>();

        blendList.m_Loop = false;

        vCamObj1 = GameObject.Find("CM vcam1");
        vCamObj2 = GameObject.Find("CM vcam2");
        vCam1 = vCamObj1.GetComponent<CinemachineVirtualCameraBase>();
        vCam2 = vCamObj2.GetComponent<CinemachineVirtualCameraBase>();
    }

    public void buttonLeft()
    {
        vCamObj1.transform.SetParent(this.transform);
        vCamObj2.transform.SetParent(this.transform);

        blendList.m_Instructions[0].m_VirtualCamera = vCam1;
        blendList.m_Instructions[1].m_VirtualCamera = vCam2;

        blendList.m_Instructions[1].m_Blend.m_Style = CinemachineBlendDefinition.Style.EaseInOut;
        blendList.m_Instructions[1].m_Blend.m_Time = 2.0f;

        blendList.m_Instructions[0].m_Hold = 1.0f;
    }

    public void buttonRight()
    {
        vCamObj2.transform.SetParent(this.transform);
        vCamObj1.transform.SetParent(this.transform);

        blendList.m_Instructions[0].m_VirtualCamera = vCam2;
        blendList.m_Instructions[1].m_VirtualCamera = vCam1;

        blendList.m_Instructions[1].m_Blend.m_Style = CinemachineBlendDefinition.Style.EaseInOut;
        blendList.m_Instructions[1].m_Blend.m_Time = 2.0f;

        blendList.m_Instructions[0].m_Hold = 1.0f;
    }
}
위의 스크립트는 Blend List Camera의 설정 사항을 스크립트로 제어한 것이다.
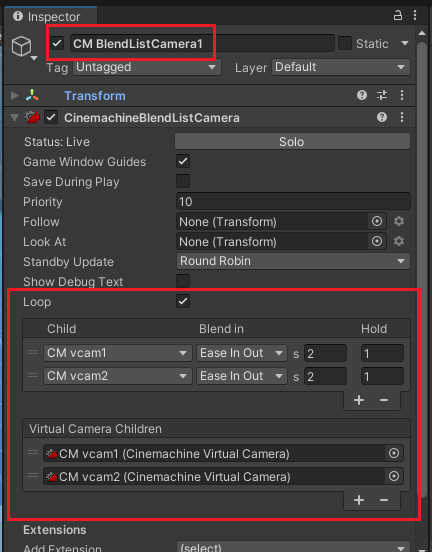
Blend List에 사용할 카메라들은 Blend List의 자식으로 설정해야 메모리가 할당된다.
    vCamObj1.transform.SetParent(this.transform);
    vCamObj2.transform.SetParent(this.transform);
자식 오브젝트로 카메라가 설정되면 m_Instructions 배열에서 설정값을 수정할 수 있다.
    blendList.m_Instructions[0].m_VirtualCamera = vCam1;
    blendList.m_Instructions[1].m_VirtualCamera = vCam2;

    blendList.m_Instructions[1].m_Blend.m_Style = CinemachineBlendDefinition.Style.EaseInOut;
    blendList.m_Instructions[1].m_Blend.m_Time = 2.0f;

    blendList.m_Instructions[0].m_Hold = 1.0f;
위의 스크립트를 실행하면 아래의 결과를 얻는다.
그런데 Player → Ground로 카메라가 이동하거나,
Ground → Player로 이동할 때, 카메라의 초점이 애매하다.
Player에서 Ground로 갈 때 Ground를 향하고,
Ground에서 Player를 갈 때는 Player를 향한 다음에 움직이도록 해보자.
using System.Collections;
using System.Collections.Generic;
using UnityEngine;
using Cinemachine;

public class CMBlendListSetting : MonoBehaviour
{
    public GameObject player, ground;

    ...

    public void buttonLeft()
    {
        ...
        blendList.m_Instructions[0].m_Hold = 1.0f;

        vCam1.LookAt = ground.transform;
        vCam2.LookAt = ground.transform;
    }

    public void buttonRight()
    {
        ...
        blendList.m_Instructions[0].m_Hold = 1.0f;

        vCam1.LookAt = player.transform;
        vCam2.LookAt = player.transform;
    }
}
blend List 설정이 완료된 후, 각 vCam에 LookAt으로 오브젝트를 설정하였다.
public으로 선언한 Player와 Ground는 아래와 같이 설정한다.
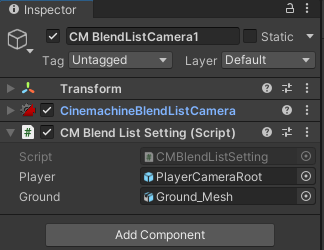
결과는 아래와 같다.
Player → Ground로 이동할 때는 오히려 더 어색하다.
따라서 buttonLeft의 vCam1은 LookAt을 설정하지 않는다.
    public void buttonLeft()
    {
        ...
        blendList.m_Instructions[0].m_Hold = 1.0f;

        //vCam1.LookAt = ground.transform;
        vCam2.LookAt = ground.transform;
    }
그러면 아래와 같이 화면 전환이 일어난다.
자연스러움의 정도는 취향차이가 있으므로 설정값을 바꿔가면서 원하는대로 맞추면 된다.
전체 코드는 다음과 같다.
using System.Collections;
using System.Collections.Generic;
using UnityEngine;
using Cinemachine;

public class CMBlendListSetting : MonoBehaviour
{
    public GameObject player, ground;

    CinemachineBlendListCamera blendList;

    GameObject vCamObj1;
    GameObject vCamObj2;
    CinemachineVirtualCameraBase vCam1;
    CinemachineVirtualCameraBase vCam2;

    void Start()
    {
        blendList = this.GetComponent<CinemachineBlendListCamera>();

        blendList.m_Loop = false;

        vCamObj1 = GameObject.Find("CM vcam1");
        vCamObj2 = GameObject.Find("CM vcam2");
        vCam1 = vCamObj1.GetComponent<CinemachineVirtualCameraBase>();
        vCam2 = vCamObj2.GetComponent<CinemachineVirtualCameraBase>();
    }

    public void buttonLeft()
    {
        vCamObj1.transform.SetParent(this.transform);
        vCamObj2.transform.SetParent(this.transform);

        blendList.m_Instructions[0].m_VirtualCamera = vCam1;
        blendList.m_Instructions[1].m_VirtualCamera = vCam2;

        blendList.m_Instructions[1].m_Blend.m_Style = CinemachineBlendDefinition.Style.EaseInOut;
        blendList.m_Instructions[1].m_Blend.m_Time = 2.0f;

        blendList.m_Instructions[0].m_Hold = 1.0f;

        //vCam1.LookAt = ground.transform;
        vCam2.LookAt = ground.transform;
    }

    public void buttonRight()
    {
        vCamObj2.transform.SetParent(this.transform);
        vCamObj1.transform.SetParent(this.transform);

        blendList.m_Instructions[0].m_VirtualCamera = vCam2;
        blendList.m_Instructions[1].m_VirtualCamera = vCam1;

        blendList.m_Instructions[1].m_Blend.m_Style = CinemachineBlendDefinition.Style.EaseInOut;
        blendList.m_Instructions[1].m_Blend.m_Time = 2.0f;

        blendList.m_Instructions[0].m_Hold = 1.0f;

        vCam1.LookAt = player.transform;
        vCam2.LookAt = player.transform;
    }
}
참고:
Blend List 카메라의 자식 카메라의 Aim이 Do nothing으로 설정되면 카메라 전환이 Target을 향하지 않을 수 있다.
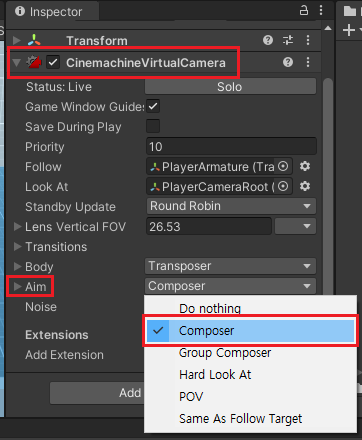
vCam이 Do nothing으로 설정된 경우의 화면 전환이다.
카메라가 오브젝트를 가르키지 않고 움직여서 매우 부자연스럽게 보인다.
Unity Plus:
Easy 2D, 3D, VR, & AR software for cross-platform development of games and mobile apps. - Unity Store
Have a 2D, 3D, VR, or AR project that needs cross-platform functionality? We can help. Take a look at the easy-to-use Unity Plus real-time dev platform!
store.unity.com
Unity Pro:
Unity Pro
The complete solutions for professionals to create and operate.
unity.com
Unity 프리미엄 학습:
Unity Learn
Advance your Unity skills with live sessions and over 750 hours of on-demand learning content designed for creators at every skill level.
unity.com
'개발 > Unity' 카테고리의 다른 글
| (9) State Driven Camera로 애니메이션의 상태에 따라 화면 전환하기 - 유니티 시네머신 튜토리얼 (0) | 2022.09.20 |
|---|---|
| (8) 우선순위를 설정해서 카메라 전환하기 - 유니티 시네머신 튜토리얼 (1) | 2022.09.19 |
| (6) Blend List Camera로 자연스럽게 시야 변경하기 - 유니티 시네머신 튜토리얼 (0) | 2022.09.19 |
| (5) Blend List Camera로 카메라 전환하기 - 유니티 시네머신 튜토리얼 (0) | 2022.09.19 |
| (4) 스크립트로 FreeLook Camera 제어하기 - 유니티 시네머신 튜토리얼 (0) | 2022.09.19 |


댓글