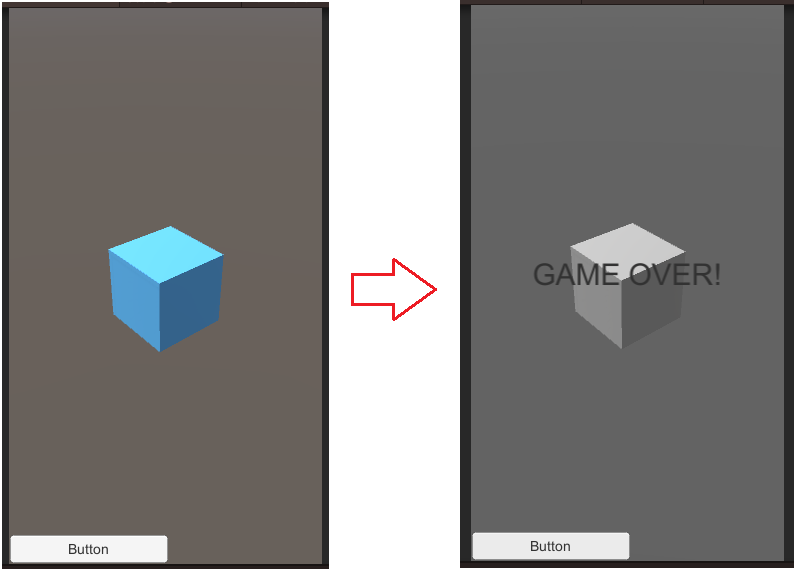
아래와 같이 게임이 종료되었을 때, 카메라를 흑백 처리하여서 GAME OVER가 되도록 해보자.
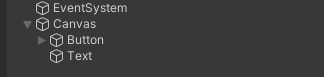
적당히 원하는 게임 씬을 만들고, Canvas에 Text와 Button을 추가한다.
Button에 이벤트를 연결할 것이므로 EventSystem도 추가한다.
여기서는 버튼을 누를 경우 gameOverCameraEffect()를 호출해 강제로 GameOver가 되도록 할 예정이다.
실제 게임에서는 게임 오버 조건을 만족할 경우 gameOverCameraEffect()를 호출하면 된다.
Text도 미리 사이즈를 원하는대로 조절하도록 하자.
카메라에는 CameraGameOverEffect.cs를 추가한다.
using System.Collections;
using System.Collections.Generic;
using UnityEngine;
using UnityEngine.UI;

public class CameraGameOverEffect : MonoBehaviour
{
    Material cameraMaterial;
    public float grayScale = 0.0f;

    public Text message;
    float appliedTime = 2.0f;

    void Start()
    {
        message.enabled = false;
        cameraMaterial = new Material(Shader.Find("Custom/Grayscale"));
    }

    //후처리 효과. src 이미지(현재 화면)를 dest 이미지로 교체
    void OnRenderImage(RenderTexture src, RenderTexture dest)
    {
        cameraMaterial.SetFloat("_Grayscale", grayScale);
        Graphics.Blit(src, dest, cameraMaterial);
    }

    public void gameOverCameraEffect()
    {
        StartCoroutine(gameOverEffect());
    }

    private IEnumerator gameOverEffect()
    {
        float elapsedTime = 0.0f;

        while(elapsedTime < appliedTime)
        {
            elapsedTime += Time.deltaTime;

            grayScale = elapsedTime / appliedTime;
            yield return null;
        }

        message.text = "GAME OVER!";
        message.enabled = true;
    }
}
grayScale이 0이면 현재의 화면이고 1이면 흑백 처리가 완료된 화면이다.
appliedTime이 2.0f라는 것은 2초 동안 서서히 흑백 처리가 되는 것을 의미한다.
Start에서는 텍스트를 off하고, camera 이펙트를 적용할 쉐이더를 찾는다.
나중에 만들 쉐이더의 이름을 Custom/Grayscale로 할 예정이다.
    Material cameraMaterial;
    public float grayScale = 0.0f;

    public Text message;
    float appliedTime = 2.0f;

    void Start()
    {
        message.enabled = false;
        cameraMaterial = new Material(Shader.Find("Custom/Grayscale"));
    }
현재 화면을 변경하기 위해서 OnRenderImage를 이용해 화면에 효과를 준다.
Material의 SetFloat으로 쉐이더의 값을 조절할 수 있다.
그리고 Graphics.Bilt를 이용하여 쉐이더가 처리한 이미지를 유니티 렌더러에 다시 돌려준다.
    void OnRenderImage(RenderTexture src, RenderTexture dest)
    {
        cameraMaterial.SetFloat("_Grayscale", grayScale);
        Graphics.Blit(src, dest, cameraMaterial);
    }
이런 것을 후처리 효과(Postprocessing Effects)라 한다. 자세한 내용은 유니티 공식 문서를 참고하자.
https://docs.unity3d.com/kr/530/ScriptReference/MonoBehaviour.OnRenderImage.html
MonoBehaviour-OnRenderImage(RenderTexture,RenderTexture) - Unity 스크립팅 API
OnRenderImage is called after all rendering is complete to render image.
docs.unity3d.com
마지막으로 코루틴을 이용해 서서히 grayScale을 1까지 올린다.
    public void gameOverCameraEffect()
    {
        StartCoroutine(gameOverEffect());
    }

    private IEnumerator gameOverEffect()
    {
        float elapsedTime = 0.0f;

        while(elapsedTime < appliedTime)
        {
            elapsedTime += Time.deltaTime;

            grayScale = elapsedTime / appliedTime;
            yield return null;
        }

        message.text = "GAME OVER!";
        message.enabled = true;
    }
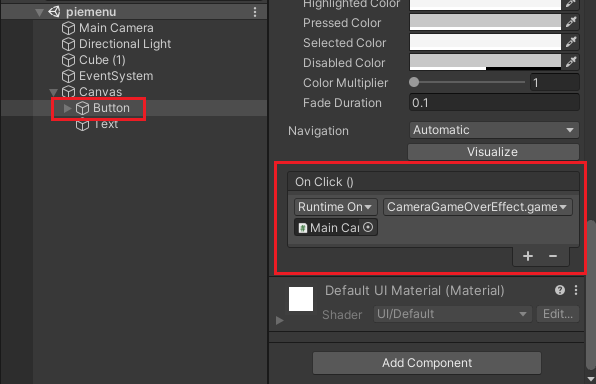
이제 gameOverCameraEffect를 public으로 선언하여 Button의 OnClick에 연결해주면 된다.
이제 쉐이더를 만들자.
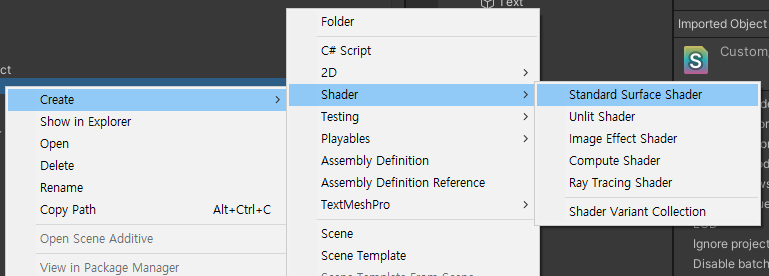
셰이더 파일의 이름이 뭐든 간에, 파일 내부의 Shader 옆의 이름을 Shader.Find가 찾는다.
new Material(Shader.Find("Custom/Grayscale"));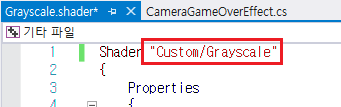
Properties에는 현재의 텍스처인 _MainTex와 grayscale을 조절할 _Grayscale를 선언한다.
	Properties
	{
		_MainTex ("Base (RGB)", 2D) = "white" {}
		_Grayscale("Grayscale", Range(0.0, 1.0)) = 0.0
	}
여기서의 _Grayscale이 CameraGameOverEffect.cs에서 Material이 SetFloat으로 조절한 값이다.
cameraMaterial.SetFloat("_Grayscale", grayScale);
OnRenderImage의 RenderTexture를 셰이더에서 받기 위해 frag 함수를 사용해야 한다.
frag에서 각 픽셀의 최종 색상을 return한다.
그리고 frag 함수에서 사용할 수 있도록 변수도 선언한다.
CGPROGRAM
#pragma vertex vert_img
#pragma fragment frag
#include "UnityCG.cginc"

sampler2D _MainTex;
float _Grayscale;

fixed4 frag(v2f_img i) : COLOR
{ ... }
grayscale을 만드는 방법은 여러 가지가 있다.
가장 간단한 방법은 RGB의 값을 모두 더한 후 3으로 나누는 것이다.
float grayscale = (currentText.r + currentText.g + currentText.b) / 3;
YUV나 그 외 방법은 직접 찾아보도록 하자.
Image Processing 101 Chapter 1.3: Color Space Conversion
Continue with our image processing 101 series, learn about how to convert color images to grayscale and black/white images.
www.dynamsoft.com
frag에서 현재 이미지를 받은 후 grayscale을 적용하여 OnRenderImage의 dest가 되도록 반환한다.
_Grayscale(스크립트의 grayScale)가 1이 되면 100% 흑백(= grayscale)이 적용된다.
fixed4 frag(v2f_img i) : COLOR
{
	fixed4 currentText = tex2D(_MainTex, i.uv);

	// simple grayscale
	float grayscale = (currentText.r + currentText.g + currentText.b) / 3;

	//YUV
	//float grayscale = 0.299 * currentText.r + 0.587 * currentText.g + 0.114 * currentText.b;

	fixed4 color = lerp(currentText, grayscale, _Grayscale);

	currentText.rgb = color;

	return currentText;
}
Shader의 최종 코드는 아래와 같다.
Shader "Custom/Grayscale"
{
	Properties
	{
		_MainTex ("Base (RGB)", 2D) = "white" {}
		_Grayscale("Grayscale", Range(0.0, 1.0)) = 0.0
	}

	SubShader
	{
		Pass
		{
			CGPROGRAM
			#pragma vertex vert_img
			#pragma fragment frag
			#include "UnityCG.cginc"

			sampler2D _MainTex;
			float _Grayscale;

			fixed4 frag(v2f_img i) : COLOR
			{
				fixed4 currentText = tex2D(_MainTex, i.uv);

				// simple grayscale
				float grayscale = (currentText.r + currentText.g + currentText.b) / 3;

				//YUV
				//float grayscale = 0.299 * currentText.r + 0.587 * currentText.g + 0.114 * currentText.b;

				fixed4 color = lerp(currentText, grayscale, _Grayscale);

				currentText.rgb = color;

				return currentText;
			}

		ENDCG
		}
	}
	FallBack off
}
참고.
Fallback "name"은 하드웨어가 실행될 수 있는 서브 쉐이더가 없는 경우 "name" 서브 쉐이더를 사용해라는 의미다.
Fallback off는 하드웨어에서 실행 가능한 서브 쉐이더가 없는 경우에 경고를 출력하지 않는다.
이제 버튼을 누르면 화면이 점점 흑백이 되면서 마치 게임이 종료된 것과 같은 효과를 볼 수 있다.
Unity Plus:
Easy 2D, 3D, VR, & AR software for cross-platform development of games and mobile apps. - Unity Store
Have a 2D, 3D, VR, or AR project that needs cross-platform functionality? We can help. Take a look at the easy-to-use Unity Plus real-time dev platform!
store.unity.com
Unity Pro:
Unity Pro
The complete solutions for professionals to create and operate.
unity.com
Unity 프리미엄 학습:
Unity Learn
Advance your Unity skills with live sessions and over 750 hours of on-demand learning content designed for creators at every skill level.
unity.com
'개발 > Unity' 카테고리의 다른 글
| 유니티 - BoundBox로 블럭이 움직일 위치 미리 예상하기 (Runtime Collider, 런타임 콜라이더) (0) | 2022.06.12 |
|---|---|
| 유니티 - 드래그로 블럭 옆으로 한 칸 움직이기 (Drag GameObject Snapped to a Grid) (0) | 2022.06.12 |
| 유니티 - 전처리기 지시문을 사용하여 조건부 컴파일하기 (Scripting Define Symbols) (0) | 2022.06.10 |
| 유니티 - 스크립트로 게임 일시정지하기 (Unity Pause by Scirpt) (0) | 2022.06.10 |
| 유니티 쉐이더 - 속성 타입과 인터페이스 옵션 (Properties Type and Interface Attributes) (0) | 2022.06.06 |


댓글