파이 메뉴 만들기 (Pie / Radial Menu)
(6) 버튼에 이벤트 연결하기
마지막으로 만들어진 파이 메뉴의 버튼에 적절한 이벤트를 연결해보자.

빈 오브젝트 TestEvent를 생성한 후 TestEvent.cs를 추가한다.

using System.Collections;
using System.Collections.Generic;
using UnityEngine;

public class TestEvent : MonoBehaviour
{
    public void Test1()
    {
        Debug.Log("Test1");
    }

    public void Test2()
    {
        Debug.Log("Test2");
    }

    public void Test3()
    {
        Debug.Log("Test3");
    }

    public void Test4()
    {
        Debug.Log("Test4");
    }
}
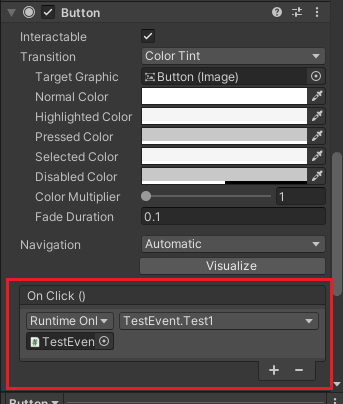
각 Button에 원하는 함수를 OnClick()에 연결한다.
OnClick에 TestEvent를 추가하면 TestEvent.cs에서 정의한 함수를 사용할 수 있다.
PieButton.cs의 OnPointerClick는 주석 처리한다.
    public void OnPointerClick(PointerEventData eventData)
    {
        //Debug.Log("click");
    }
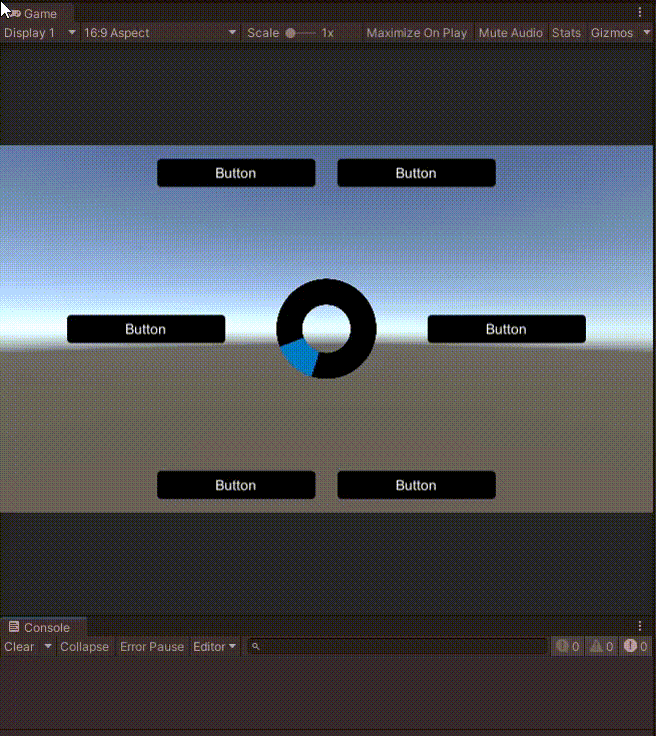
이제 연결된 버튼 - 함수가 정상적으로 작동하는지 확인해보자.
원형이 배치된 이후에도 Tooltip이 제대로 나타나고 연결된 함수도 제대로 작동하는 것을 알 수 있다.
전체 코드는 아래와 같다.
Gauge.cs
using System.Collections;
using System.Collections.Generic;
using UnityEngine;
using UnityEngine.UI;

public class Gauge : MonoBehaviour
{
    Image gauge;
    Vector2 position;
    float theta;

    void Start()
    {
        position = this.transform.position;
        gauge = this.GetComponent<Image>();

        GameObject buttonSet = this.transform.parent.Find("ButtonSet").gameObject;

        int numOfChild = buttonSet.transform.childCount - 1;

        gauge.fillAmount = 1.0f / numOfChild;
        theta = 360.0f / (numOfChild);
    }

    void Update()
    {
        float angle = Mathf.Atan2(
            Input.mousePosition.y - position.y, Input.mousePosition.x - position.x)
            * Mathf.Rad2Deg /* radian -> degree */
            + 90.0f + (theta / 2.0f); /* 보정 */
        this.transform.rotation = Quaternion.AngleAxis(angle, Vector3.forward);
    }
}
PieButton.cs
using System.Collections;
using System.Collections.Generic;
using UnityEngine;
using UnityEngine.UI;
using UnityEngine.EventSystems;

public class PieButton : MonoBehaviour, IPointerEnterHandler, IPointerExitHandler, IPointerClickHandler
{
    Button btn;
    Color initColor;
    GameObject tooltip;
    bool mouseOn;
    float tooltipCount;
    float tooltipTime = 2.0f;

    Text txt;

    [TextArea]
    public string tooltipText;

    RectTransform rect;

    public void OnPointerEnter(PointerEventData eventData)
    {
        this.GetComponent<Image>().color = Color.grey;

        mouseOn = true;
    }

    public void OnPointerExit(PointerEventData eventData)
    {
        this.GetComponent<Image>().color = initColor;

        mouseOn = false;
        tooltipCount = .0f;
        tooltip.SetActive(false);
    }

    public void OnPointerClick(PointerEventData eventData)
    {
        //Debug.Log("click");
    }

    void Start()
    {
        btn = this.GetComponent<Button>();
        initColor = this.GetComponent<Image>().color;
        tooltip = this.transform.parent.transform.Find("TooltipBackground").gameObject;
        tooltipCount = .0f;

        txt = tooltip.transform.Find("Tooltip").GetComponent<Text>();
        rect = (RectTransform)tooltip.GetComponent<Image>().transform;
    }

    void Update()
    {
        if (mouseOn)
        {
            tooltipCount += Time.deltaTime;
            if (tooltipCount > tooltipTime)
            {
                tooltip.SetActive(true);

                txt.text = tooltipText;

                Vector2 pos
                    = (Vector2)this.transform.position
                    + new Vector2(txt.preferredWidth / 2, -txt.preferredHeight - 10);
                tooltip.transform.position = pos;

                rect.sizeDelta = new Vector2(txt.preferredWidth + 20, txt.preferredHeight + 20);
            }
        }
    }
}
ButtonArrangement.cs
using System.Collections;
using System.Collections.Generic;
using UnityEngine;

[ExecuteInEditMode]
public class ButtonArrangement : MonoBehaviour
{
    float radius = 180.0f;
    List<GameObject> buttons = new List<GameObject>();

    void Start()
    {
        int numOfChild = this.transform.childCount;

        for(int i = 0; i < numOfChild; i++)
        {
            GameObject child = transform.GetChild(i).gameObject;

            if (child.name == "TooltipBackground") continue;

            buttons.Add(child);
        }

        for (int i = 0; i < buttons.Count; i++)
        {
            float angle = i * (Mathf.PI * 2.0f) / buttons.Count;

            GameObject btn = buttons[i];

            btn.transform.position
                = transform.position + (new Vector3(Mathf.Cos(angle), Mathf.Sin(angle), 0)) * radius;
        }
    }
}
TestEvent.cs
using System.Collections;
using System.Collections.Generic;
using UnityEngine;

public class TestEvent : MonoBehaviour
{
    public void Test1()
    {
        Debug.Log("Test1");
    }

    public void Test2()
    {
        Debug.Log("Test2");
    }

    public void Test3()
    {
        Debug.Log("Test3");
    }

    public void Test4()
    {
        Debug.Log("Test4");
    }
}
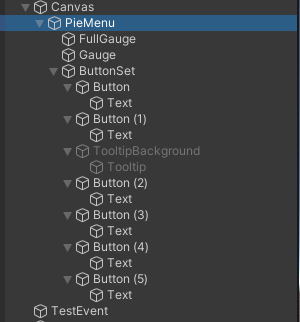
PieMenu의 Hierarchy와 TestEvent
Unity Plus:
Easy 2D, 3D, VR, & AR software for cross-platform development of games and mobile apps. - Unity Store
Have a 2D, 3D, VR, or AR project that needs cross-platform functionality? We can help. Take a look at the easy-to-use Unity Plus real-time dev platform!
store.unity.com
Unity Pro:
Unity Pro
The complete solutions for professionals to create and operate.
unity.com
Unity 프리미엄 학습:
Unity Learn
Advance your Unity skills with live sessions and over 750 hours of on-demand learning content designed for creators at every skill level.
unity.com
'개발 > Unity' 카테고리의 다른 글
| 유니티 - 3차원 세 점의 좌표로 삼각형의 넓이 구하기 (0) | 2022.05.11 |
|---|---|
| 유니티 - 콜라이더의 중심과 경계 (center, extents) (0) | 2022.05.11 |
| (5) 버튼 배치하기 - 파이 메뉴(Pie / Radial Menu) 만들기 (0) | 2022.05.10 |
| (4) Text 자동 크기 조절 - 파이 메뉴(Pie / Radial Menu) 만들기 (0) | 2022.05.09 |
| (3) Tooltip 만들기 - 파이 메뉴(Pie / Radial Menu) 만들기 (0) | 2022.05.09 |


댓글