이전 - (10) handsontable basic options
현재 - (11) handsontable setting options
다음 - (12) table의 dummy 행과 열을 추가하기
DropDown Menu
dropdownMenu에 true 옵션을 주면 column에 dropdown 메뉴가 생긴다.
myTable = new Handsontable(container, {
  data: data,
  colHeaders: true,
  rowHeaders: true,
  width: "50%",
  manualColumnResize: true,
  manualRowResize: true,
  dropdownMenu: true,
  licenseKey: "non-commercial-and-evaluation",
});
아래와 같이 left, right에 column을 삽입할 수 있고, 현재 column을 제거하거나 clear할 수 있다.
또한 Read Only로 변경하여 수정을 못하도록 할 수도 있다.
Alignment에서는 정렬 기능을 제공한다.

Alignment에 Center와 Middle에 check를 주변, 행과 열의 모두 가운데에 값이 정렬된다.
dropdownMenu에 특정 menu만 보이게 할 수도 있다.
아래는 삭제, read Only 옵션, 정렬만 보이게 하는 코드다.
myTable = new Handsontable(container, {
  data: data,
  colHeaders: true,
  rowHeaders: true,
  width: "50%",
  manualColumnResize: true,
  manualRowResize: true,
  dropdownMenu: [
    'remove_col',
    '---------',
    'make_read_only',
    '---------',
    'alignment'
  ],
  licenseKey: "non-commercial-and-evaluation",
});
Filters
filters에 true 옵션을 주면 필터링 기능을 추가할 수 있다.
myTable = new Handsontable(container, {
  data: data,
  colHeaders: true,
  rowHeaders: true,
  width: "50%",
  manualColumnResize: true,
  manualRowResize: true,
  dropdownMenu: true,
  filters: true,
  licenseKey: "non-commercial-and-evaluation",
});
customizing 하고 싶은 경우는 링크를 참고하자.
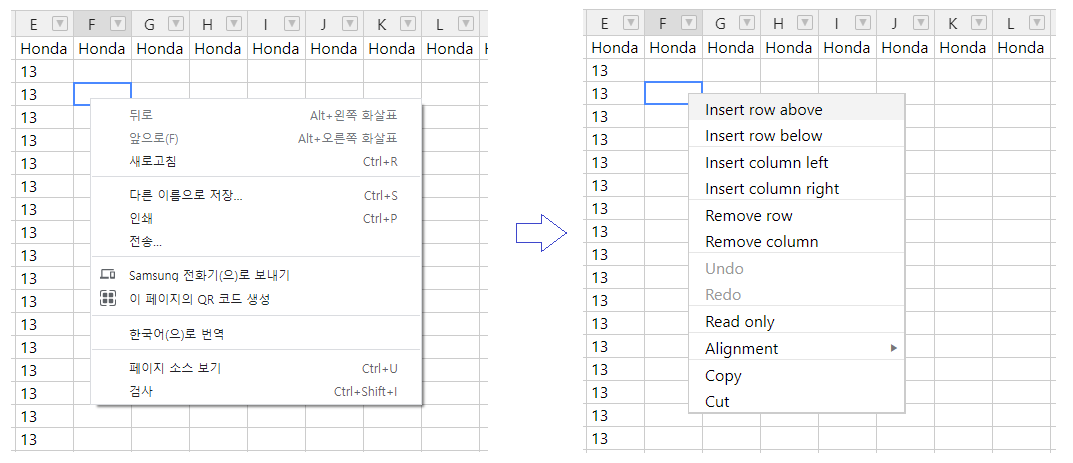
Context Menu
contextMenu에 true 옵션을 주면 마우스 오른쪽 버튼 클릭 시 menu가 생긴다.
myTable = new Handsontable(container, {
  data: data,
  colHeaders: true,
  rowHeaders: true,
  width: "50%",
  manualColumnResize: true,
  manualRowResize: true,
  dropdownMenu: true,
  filters: true,
  contextMenu: true,
  licenseKey: "non-commercial-and-evaluation",
});
cell에 마우스 오른쪽 버튼을 클릭한 경우 여러 menu가 생기는 것을 볼 수 있다.
dropdownMenu처럼 특정 menu만 보이게 할 수 있다.
아래의 코드를 참고하자.
myTable = new Handsontable(container, {
  data: data,
  colHeaders: true,
  rowHeaders: true,
  width: "50%",
  manualColumnResize: true,
  manualRowResize: true,
  dropdownMenu: true,
  filters: true,
  contextMenu: {
    items: {
      'row_above': {
        name: 'Insert row above this one (custom name)'
      },
      'row_below': {},
      'separator': Handsontable.plugins.ContextMenu.SEPARATOR,
      'clear_custom': {
        name: 'Clear all cells (custom)',
        callback: function() {
          this.clear();
        }
      }
    }
  },
  licenseKey: "non-commercial-and-evaluation",
});
원하는 menu만 나오는 것을 확인할 수 있다. (menu name도 변경되었다.)

더 많은 기능은 handsontable 문서를 참고하자.
여기서 만들 csv 편집기는 아래의 기능을 허용하도록 하자.
myTable = new Handsontable(container, {
  data: data,
  colHeaders: true,         /* column header는 보이게 설정 */
  rowHeaders: true,         /* row header 보이게 설정 */
  width: "50%",
  manualColumnResize: true, /* column 사이즈 조절 */
  manualRowResize: true,    /* row 사이즈 조절 */
  manualColumnMove: true,   /* column move 허용 */
  manualRowMove: true,      /* row move 허용 */
  dropdownMenu: true,       /* dropdown 메뉴 설정 */
  filters: true,            /* 필터 기능 on */
  contextMenu: true,        /* cell 클릭 시 메뉴 설정 */
  licenseKey: "non-commercial-and-evaluation",
});'개발 > React' 카테고리의 다른 글
| React Handsontable로 csv 편집기 만들기 (13) (0) | 2021.06.09 |
|---|---|
| React Handsontable로 csv 편집기 만들기 (12) (0) | 2021.06.08 |
| React Handsontable로 csv 편집기 만들기 (10) (0) | 2021.06.06 |
| React Handsontable로 csv 편집기 만들기 (9) (1) | 2021.06.05 |
| React Handsontable로 csv 편집기 만들기 (8) (0) | 2021.06.04 |


댓글