아래 그림과 같이 라인 렌더러를 이용하여 그리드를 만들어보자.

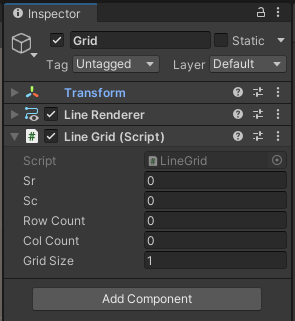
빈 오브젝트에 LineGrid.cs를 추가한다.
sr, sc는 시작 좌표, rowCount, colCount는 Grid의 개수, gridSize는 그리드의 크기가 된다.
구현
라인 렌더러를 여러 개 쓰는 방법으로 적당히 구현해도 되지만,
여기에서는 한 개의 라인 렌더러만 써서 구현해보자.
먼저 하나의 선으로 그리드를 만들기 위해서는 아래 처럼 ㄹ자 모양이 되도록 선을 그린다.
x 좌표는 gridSize만큼 증가시키고, toggle을 이용해서 z 좌표는 늘렸다가 줄였다가를 반복하면 된다.
    int toggle = -1;
    Vector3 currentPos = new Vector3(sr, this.transform.position.y, ec);
    for (int i = 0; i < rowCount; i++)
    {
        Vector3 nextPos = currentPos;

        nextPos.x += gridSize;
        gridPos.Add(nextPos);

        nextPos.z += (colCount * toggle * gridSize);
        gridPos.Add(nextPos);

        currentPos = nextPos;
        toggle *= -1;
    }
이 과정이 완료되면 남은 grid를 비슷한 방법으로 채운다.
이때 column이 짝수냐 홀수냐 (currentPos.z == ec)에 따라 시작해야하는 toggle이 달라진다.
        currentPos.x = sr;
        gridPos.Add(currentPos);

        int colToggle = toggle = 1;
        if (currentPos.z == ec) colToggle = -1;

        for (int i = 0; i < colCount; i++)
        {
            Vector3 nextPos = currentPos;

            nextPos.z += (colToggle * gridSize);
            gridPos.Add(nextPos);

            nextPos.x += (rowCount * toggle * gridSize);
            gridPos.Add(nextPos);

            currentPos = nextPos;
            toggle *= -1;
        }
게임을 실행한 후, sr, sc, rowCount, colCount, gridSize를 적절히 변경해보자.

전체 코드는 다음과 같다.
using System.Collections;
using System.Collections.Generic;
using UnityEngine;

public class LineGrid : MonoBehaviour
{
    LineRenderer lr;
    public float sr, sc;
    public int rowCount, colCount;
    public float gridSize;

    void OnValidate()
    {
        if (rowCount + colCount > 0)
        {
            makeGrid(lr, sr, sc, rowCount, colCount);
        }
    }

    void initLineRenderer(LineRenderer lr)
    {
        lr.startWidth = lr.endWidth = 0.1f;
        lr.material.color = Color.blue;
    }

    void makeGrid(LineRenderer lr, float sr, float sc, int rowCount, int colCount)
    {
        List<Vector3> gridPos = new List<Vector3>();

        float ec = sc + colCount * gridSize;

        gridPos.Add(new Vector3(sr, this.transform.position.y, sc));
        gridPos.Add(new Vector3(sr, this.transform.position.y, ec));

        int toggle = -1;
        Vector3 currentPos = new Vector3(sr, this.transform.position.y, ec);
        for (int i = 0; i < rowCount; i++)
        {
            Vector3 nextPos = currentPos;

            nextPos.x += gridSize;
            gridPos.Add(nextPos);

            nextPos.z += (colCount * toggle * gridSize);
            gridPos.Add(nextPos);

            currentPos = nextPos;
            toggle *= -1;
        }

        currentPos.x = sr;
        gridPos.Add(currentPos);

        int colToggle = toggle = 1;
        if (currentPos.z == ec) colToggle = -1;

        for (int i = 0; i < colCount; i++)
        {
            Vector3 nextPos = currentPos;

            nextPos.z += (colToggle * gridSize);
            gridPos.Add(nextPos);

            nextPos.x += (rowCount * toggle * gridSize);
            gridPos.Add(nextPos);

            currentPos = nextPos;
            toggle *= -1;
        }

        lr.positionCount = gridPos.Count;
        lr.SetPositions(gridPos.ToArray());
    }

    void Start()
    {
        lr = this.GetComponent<LineRenderer>();
        initLineRenderer(lr);

        makeGrid(lr, sr, sc, rowCount, colCount);
    }
}
Unity Plus:
Easy 2D, 3D, VR, & AR software for cross-platform development of games and mobile apps. - Unity Store
Have a 2D, 3D, VR, or AR project that needs cross-platform functionality? We can help. Take a look at the easy-to-use Unity Plus real-time dev platform!
store.unity.com
Unity Pro:
Unity Pro
The complete solutions for professionals to create and operate.
unity.com
Unity 프리미엄 학습:
Unity Learn
Advance your Unity skills with live sessions and over 750 hours of on-demand learning content designed for creators at every skill level.
unity.com


댓글