Cinemachine Tutorial
- (10) State Driven Camera 속성 및 설정 (Control State Driven Camera Attributes and Settings by Script)
- (11) ClearShot Camera로 충돌을 감지하여 카메라 전환하기
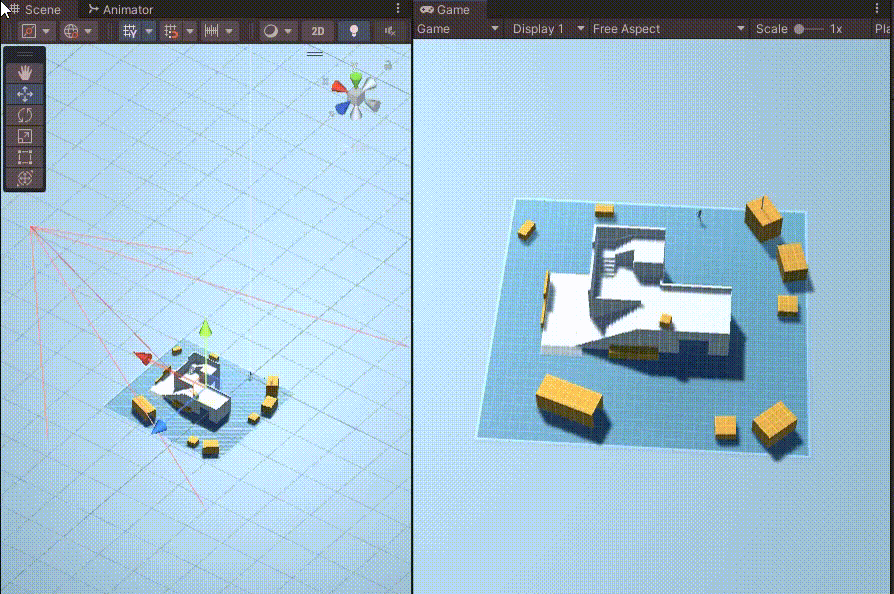
스테이트 드라이브 카메라로 아바타의 상태에 따라 카메라를 전환하였다.
아래의 스크립트를 State Drive Camera에 추가하면 설정을 스크립트로 제어할 수 있다.
Blend List 카메라의 스크립트와 거의 비슷하다.
using System.Collections;
using System.Collections.Generic;
using UnityEngine;
using Cinemachine;
using UnityEditor.Animations;

public class CMStateDrivenSetting : MonoBehaviour
{
    public GameObject player, ground;

    Animator animator;

    CinemachineStateDrivenCamera stateDriven;

    GameObject vCamObj1;
    GameObject vCamObj2;
    CinemachineVirtualCameraBase vCam1;
    CinemachineVirtualCameraBase vCam2;

    void Start()
    {
        animator = player.GetComponent<Animator>();
        stateDriven = this.GetComponent<CinemachineStateDrivenCamera>();

        vCamObj1 = GameObject.Find("CM vcam1");
        vCamObj2 = GameObject.Find("CM vcam2");

        vCam1 = vCamObj1.GetComponent<CinemachineVirtualCameraBase>();
        vCam2 = vCamObj2.GetComponent<CinemachineVirtualCameraBase>();

        vCam1.Follow = ground.transform;
        vCam1.LookAt = ground.transform;
        vCam2.LookAt = player.transform;

        vCamObj1.transform.SetParent(this.transform);
        vCamObj2.transform.SetParent(this.transform);

        //stateDriven.m_Instructions[0].m_FullHash = Animator.StringToHash("Base Layer.InAir");
        //stateDriven.m_Instructions[1].m_FullHash = Animator.StringToHash("Base Layer.Idle Walk Run Blend");

        stateDriven.m_Instructions[0].m_FullHash = -1184316583;
        stateDriven.m_Instructions[1].m_FullHash = 2133340701;

        stateDriven.m_Instructions[0].m_VirtualCamera = vCam1;
        stateDriven.m_Instructions[1].m_VirtualCamera = vCam2;

        stateDriven.m_Instructions[0].m_ActivateAfter = 1.0f;
        stateDriven.m_Instructions[1].m_ActivateAfter = 1.0f;

        stateDriven.m_Instructions[0].m_MinDuration = 2.0f;
        stateDriven.m_Instructions[1].m_MinDuration = 2.0f;
    }

    private void Update()
    {
        //Debug.Log(stateDriven.m_Instructions[0].m_FullHash);
        //Debug.Log(stateDriven.m_Instructions[1].m_FullHash);
    }
}
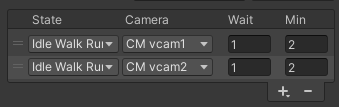
m_VirtualCamera은 할당해야하는 가상카메라이며,
m_ActivateAfter는 Wait, m_MinDuration은 Min이 된다.
문제는 State에 m_FullHash를 할당하기가 어렵다는 것이다.
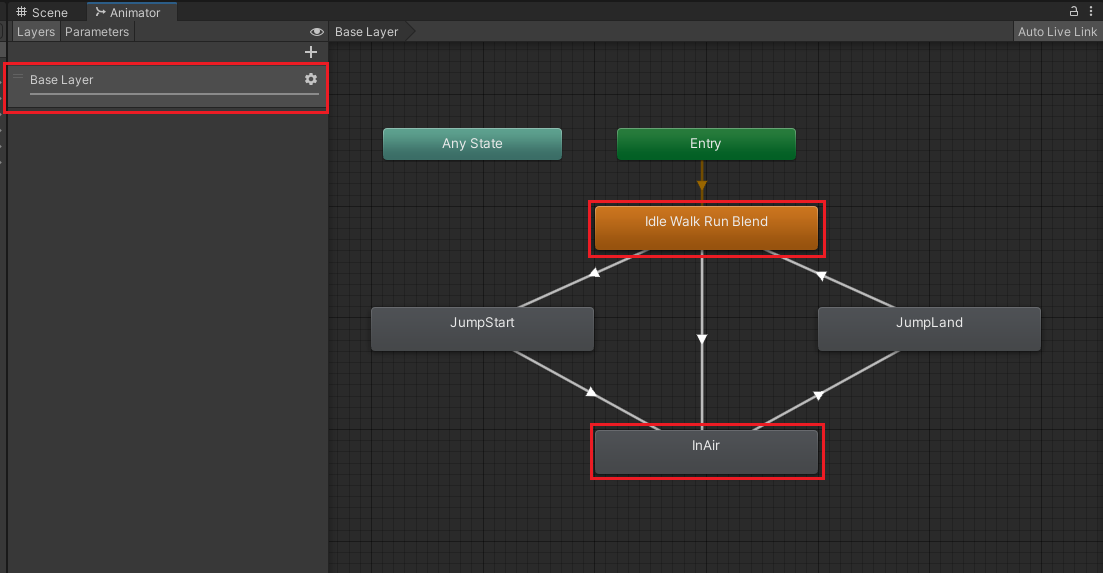
현재 Animator에는 Base Layer > Idle Walk Run Blend와 InAir와 같은 애니메이션이 있다.
m_FullHash에 Animator의 StringToHash를 이용해서 아래와 같이 해시 코드를 얻을 수 있다.
    stateDriven.m_Instructions[0].m_FullHash
        = Animator.StringToHash("Base Layer.InAir");

    stateDriven.m_Instructions[1].m_FullHash
        = Animator.StringToHash("Base Layer.Idle Walk Run Blend");
하지만 여기에서는 Idle Walk Run Blend의 블렌드 트리에 있는 Idle과 Walk_N의 해시를 구해야 한다.
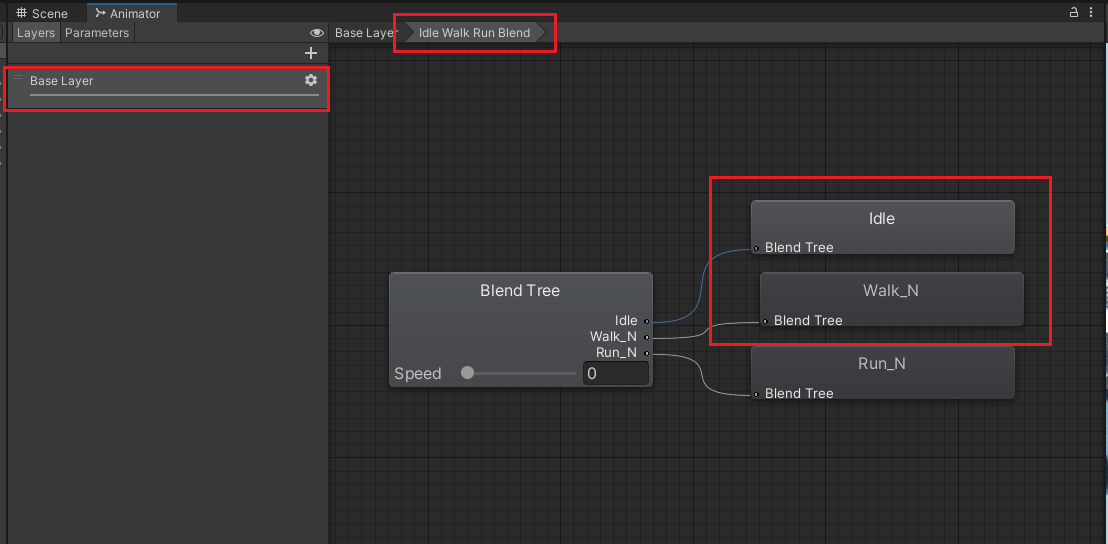
아쉽게도 아래의 코드는 Blend Tree의 hash code를 구해주지 않는다.
Animator.StringToHash("Base Layer.Idle Walk Run Blend.Idle"); //error
따라서 미리 State를 할당한 후,

Update 문에서 Debug로 로그를 찍어서 블렌드 트리의 해시 코드를 구한다.
    private void Update()
    {
        Debug.Log(stateDriven.m_Instructions[0].m_FullHash);
        Debug.Log(stateDriven.m_Instructions[1].m_FullHash);
    }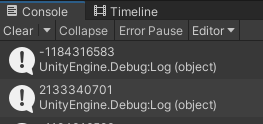
Update를 지우고 로그에 나왔던 Blend Tree의 Hash Code를 m_FullHash에 하드 코딩한다.
    stateDriven.m_Instructions[0].m_FullHash = -1184316583;
    stateDriven.m_Instructions[1].m_FullHash = 2133340701;
이제 위의 스크립트도 아래와 같이 정상적으로 아바타가 움직임에 따라 카메라가 전환되는 것을 알 수 있다.
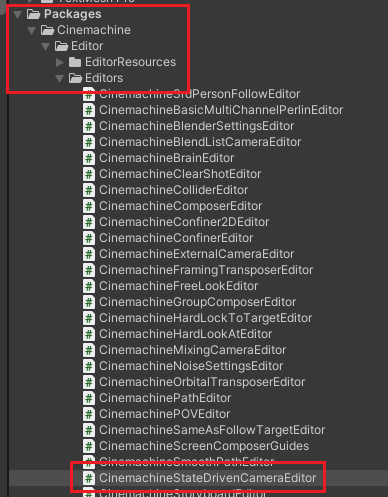
Blend Tree의 Hash Code를 구하는 방법은 CinemachineStateDrivenCameraEditor.cs를 참고하면 된다.
CollectStatesFromFSM에서 로그를 찍어보면 결과를 알 수 있다.
            void CollectStatesFromFSM(
                AnimatorStateMachine fsm, string hashPrefix, int parentHash, string displayPrefix)
            {
                ChildAnimatorState[] states = fsm.states;
                for (int i = 0; i < states.Length; i++)
                {
                    AnimatorState state = states[i].state;
                    int hash = AddState(Animator.StringToHash(hashPrefix + state.name),
                        parentHash, displayPrefix + state.name);

                    Debug.Log("Base Layer " + hash + " " + state.name);
                    // Also process clips as pseudo-states, if more than 1 is present.
                    // Since they don't have hashes, we can manufacture some.
                    var clips = CollectClips(state.motion);
                    if (clips.Count > 1)
                    {
                        string substatePrefix = displayPrefix + state.name + ".";
                        foreach (AnimationClip c in clips)
                        {
                            AddState(
                            CinemachineStateDrivenCamera.CreateFakeHash(hash, c),
                            hash, substatePrefix + c.name);

                            Debug.Log("Blend Tree " + hash + " " + c.name);
                        }
                    }
                }

                ChildAnimatorStateMachine[] fsmChildren = fsm.stateMachines;
                foreach (var child in fsmChildren)
                {
                    string name = hashPrefix + child.stateMachine.name;
                    string displayName = displayPrefix + child.stateMachine.name;
                    int hash = AddState(Animator.StringToHash(name), parentHash, displayName);
                    CollectStatesFromFSM(child.stateMachine, name + ".", hash, displayName + ".");
                }
            }
아래는 콘솔 창에 나온 hash 코드와 애니메이션의 이름이다.


Unity Plus:
Easy 2D, 3D, VR, & AR software for cross-platform development of games and mobile apps. - Unity Store
Have a 2D, 3D, VR, or AR project that needs cross-platform functionality? We can help. Take a look at the easy-to-use Unity Plus real-time dev platform!
store.unity.com
Unity Pro:
Unity Pro
The complete solutions for professionals to create and operate.
unity.com
Unity 프리미엄 학습:
Unity Learn
Advance your Unity skills with live sessions and over 750 hours of on-demand learning content designed for creators at every skill level.
unity.com
'개발 > Unity' 카테고리의 다른 글
| (12) ClearShot이 불가능한 경우 FreeLook으로 전환하기 - 유니티 시네머신 튜토리얼 (1) | 2022.09.23 |
|---|---|
| (11) ClearShot Camera로 충돌을 감지하여 카메라 전환하기 - 유니티 시네머신 튜토리얼 (0) | 2022.09.22 |
| (9) State Driven Camera로 애니메이션의 상태에 따라 화면 전환하기 - 유니티 시네머신 튜토리얼 (0) | 2022.09.20 |
| (8) 우선순위를 설정해서 카메라 전환하기 - 유니티 시네머신 튜토리얼 (1) | 2022.09.19 |
| (7) 스크립트로 Blend List Camera 제어하기 - 유니티 시네머신 튜토리얼 (0) | 2022.09.19 |


댓글