2차원 배열 디버깅
(1) 2차원 배열 인스펙터에 보여주기 (2D Array in the Inspector)
(2) 커스텀 에디터로 인스펙터 수정하기 (Inspector with Custom Editors)
(3) 에디터 윈도우에서 실시간으로 2차원 배열 디버깅하기 (EditorWindow)
(4) 에디터 윈도우에서 블럭의 위치 Mapping 하기 (EditorWindow)
커스텀 에디터(Custom Editor)로 Inspector에 2차원 배열을 디버깅 할 수 있지만,
하이어라키(Hierachy)에서 Cube를 선택해야만 보인다는 단점이 있다.

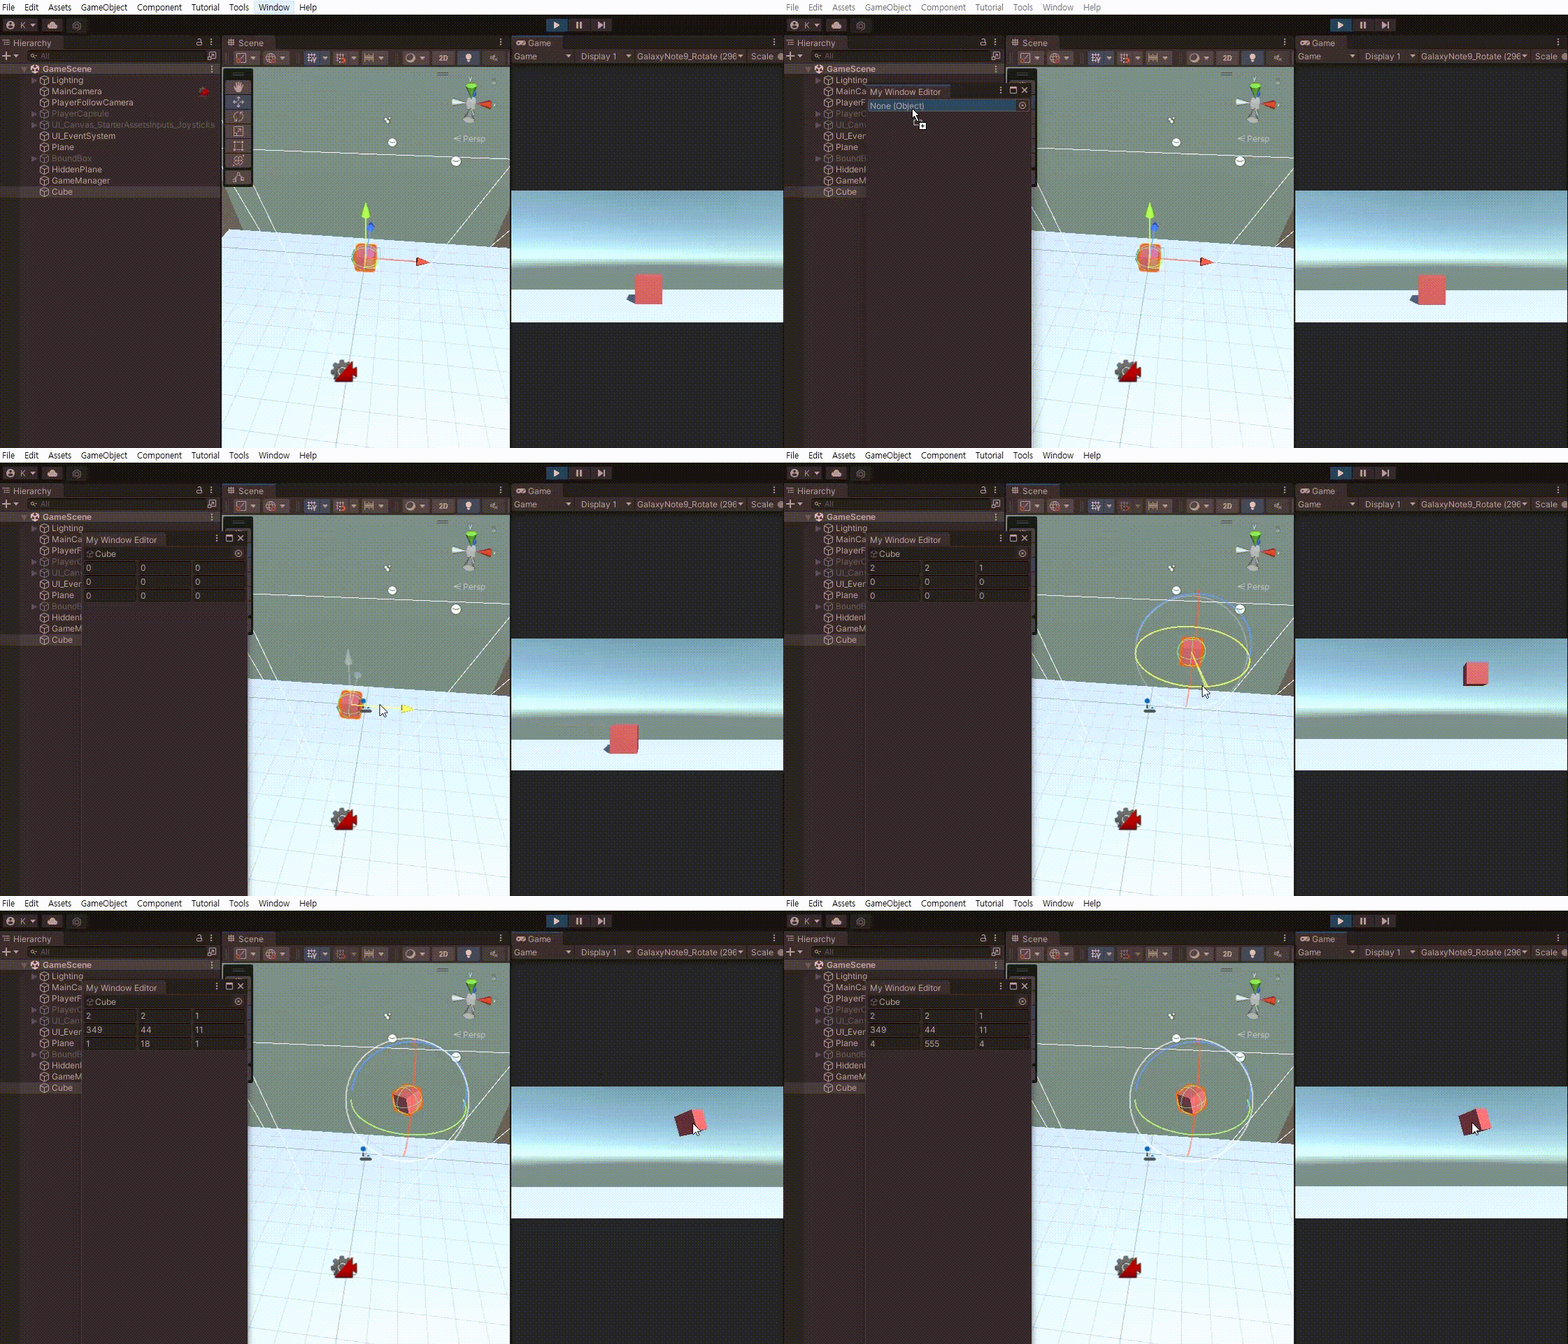
따라서 아래와 같이 아예 창을 새로 만들어 디버깅할 수 있도록 해보자.

먼저 이전 글(커스텀 에디터)에서 쓴 Cube.cs의 int a, b, c의 속성은 지운다.
에디터 윈도우는 Repaint() 함수를 직접 호출 해 언제든지 창을 새로 그릴 수 있기 때문이다.
Cube.cs
    //[SerializeField][HideInInspector]
    int a, b, c;
이제 Show2DArray.cs를 만들고 MonoBehaviour를 지우고 EditWindow를 상속한다.
EditWindow는 UnityEditor를 선언해야 상속이 가능하다.
using System.Collections;
using System.Collections.Generic;
using UnityEngine;
using UnityEditor;

public class Show2DArray : EditorWindow
{ ... }
Cube의 2차원 배열을 읽기 위해 cube 변수를 선언한다.
이때 타입은 Object여야 한다. 나중에 타입 캐스팅으로 변경해서 사용한다.
그리고 2차원 배열을 미리 선언한다.
static 함수를 선언하고, MenuItem 속성을 이용해 화면을 부른다.
현재 스크립트가 Show2DArray이기 때문에 GetWindow에서 Show2DArray가 들어간다.
titleContent도 원하는 이름으로 변경한다.
    Object cube;
    int[,] debug2d;

    [MenuItem("Tools/2D Array Console")]
    static void init()
    {
        Debug.Log("init");

        EditorWindow wnd = GetWindow<Show2DArray>();
        wnd.titleContent = new GUIContent("My Window Editor");
    }
MenuItem("Tools/2D Array Console")에 의해 아래와 같이 Tools 탭 아래에 2D ArrayConsole이 생긴다.
코드를 모두 완성하면 My Window Editor가 아래 그림처럼 보이게 된다.

그리고 OnInspectorUpdate에서 Repaint 함수를 호출한다.
    void OnInspectorUpdate()
    {
        Repaint();
    }
커스텀 에디터에서는 SerializeField를 선언해야 Inspector 창이 업데이트 되었다.
에디터 윈도우에서는 그럴 필요 없이 매번 업데이트에서 새로 그리면 된다.
Update에 그리면 매 프레임마다 갱신해서 성능 저하로 이어질 수 있다.
OnInspectorUpdate는 초당 10프레임 정도로만 호출되기 때문에 Repaint를 호출하기 적절하다.
https://docs.unity3d.com/ScriptReference/EditorWindow.OnInspectorUpdate.html
Unity - Scripting API: EditorWindow.OnInspectorUpdate()
Success! Thank you for helping us improve the quality of Unity Documentation. Although we cannot accept all submissions, we do read each suggested change from our users and will make updates where applicable. Close
docs.unity3d.com
이제 OnGUI에서 디버깅을 하기 위해 창을 그린다.
아래의 코드를 추가해보자.
    GUILayout.BeginHorizontal();
    cube = EditorGUILayout.ObjectField(cube, typeof(Object), true);
    GUILayout.EndHorizontal();
오브젝트를 넣을 수 있는 필드가 생긴다.

여기에서 받은 오브젝트(cube)를 GameObject로 타입 캐스팅해서 cube에 접근할 수 있다.
    if (cube == null) return;

    GameObject go = (GameObject)cube;
    Cube cu = go.GetComponent<Cube>();
그러나 이 경우, 창을 끄게 되면 None (Object)로 다시 초기화되는 불편함이 있다.
따라서 하드코딩으로 Cube를 찾는 방법도 가능하다.
Cube cu = GameObject.Find("Cube").GetComponent<Cube>();
Cube에 접근하였으므로 이제 2차원 배열을 복사한다.
그리고 커스텀 에디터에서 한 것과 마찬가지로 IntField를 추가한다.
    debug2d = new int[3, 3];
    debug2d = cu.array.Clone() as int[,];

    for(int i = 0;  i< 3; i++)
    {
        GUILayout.BeginHorizontal();
        for(int k = 0; k< 3; k++)
            debug2d[i, k] = EditorGUILayout.IntField(debug2d[i,k]);
        GUILayout.EndHorizontal();
    }
Show2DArray.cs의 최종 코드는 아래와 같다.
using System.Collections;
using System.Collections.Generic;
using UnityEngine;
using UnityEditor;

public class Show2DArray : EditorWindow
{
    Object cube;
    int[,] debug2d;

    [MenuItem("Tools/2D Array Console")]
    static void init()
    {
        Debug.Log("init");

        EditorWindow wnd = GetWindow<Show2DArray>();
        wnd.titleContent = new GUIContent("My Window Editor");
    }

    void OnInspectorUpdate()
    {
        Repaint();
    }

    void OnGUI()
    {
        GUILayout.BeginHorizontal();
        cube = EditorGUILayout.ObjectField(cube, typeof(Object), true);
        GUILayout.EndHorizontal();

        if (cube == null) return;

        GameObject go = (GameObject)cube;
        Cube cu = go.GetComponent<Cube>();

        //Cube cu = GameObject.Find("Cube").GetComponent<Cube>();

        debug2d = new int[3, 3];
        debug2d = cu.array.Clone() as int[,];

        for(int i = 0;  i< 3; i++)
        {
            GUILayout.BeginHorizontal();
            for(int k = 0; k< 3; k++)
                debug2d[i, k] = EditorGUILayout.IntField(debug2d[i,k]);
            GUILayout.EndHorizontal();
        }
    }
}
사용할 Cube.cs는 아래와 같다. ([SerializeField][HideInInspector] 삭제)
using System.Collections;
using System.Collections.Generic;
using UnityEngine;

public class Cube : MonoBehaviour
{
    public int[,] array = new int[3, 3];

    //[SerializeField][HideInInspector]
    int a, b, c;

    void OnMouseDown()
    {
        a++;
    }

    void OnMouseDrag()
    {
        b++;
    }

    void OnMouseUp()
    {
        c++;
    }

    void Update()
    {
        array[0, 0] = (int)this.transform.position.x;
        array[0, 1] = (int)this.transform.position.y;
        array[0, 2] = (int)this.transform.position.z;

        array[1, 0] = (int)this.transform.rotation.eulerAngles.x;
        array[1, 1] = (int)this.transform.rotation.eulerAngles.y;
        array[1, 2] = (int)this.transform.rotation.eulerAngles.z;

        array[2, 0] = a;
        array[2, 1] = b;
        array[2, 2] = c;
    }
}
코드를 모두 작성하였으면 에디터 윈도우를 켜고 큐브를 추가하자.
그리고 큐브를 움직이거나 회전시키고, 클릭을 해서 정상적으로 배열의 값이 갱신되는지 확인해보자.

윈도우 창을 새로 만들었기 때문에 보기 좋게 2차원 배열을 디버깅 할 수 있다.
그리고 Repaint에 의해 즉시 값이 갱신된다.
참고로 a, b, c 변수에 SerializeField를 선언하더라도 Repaint를 하지 않으면 값이 변경되지 않는다.
커스텀 에디터처럼 마우스를 창에 가져가야 갱신된다.
마지막으로 2차원 배열을 더 직관적으로 보도록 GUILayout.Box를 이용해보자.
(1) 2차원 배열 인스펙터에 보여주기 (2D Array in the Inspector)
(2) 커스텀 에디터로 인스펙터 수정하기 (Inspector with Custom Editors)
(3) 에디터 윈도우에서 실시간으로 2차원 배열 디버깅하기 (EditorWindow)
(4) 에디터 윈도우에서 블럭의 위치 Mapping 하기 (EditorWindow)
Unity Plus:
Easy 2D, 3D, VR, & AR software for cross-platform development of games and mobile apps. - Unity Store
Have a 2D, 3D, VR, or AR project that needs cross-platform functionality? We can help. Take a look at the easy-to-use Unity Plus real-time dev platform!
store.unity.com
Unity Pro:
Unity Pro
The complete solutions for professionals to create and operate.
unity.com
Unity 프리미엄 학습:
Unity Learn
Advance your Unity skills with live sessions and over 750 hours of on-demand learning content designed for creators at every skill level.
unity.com
'개발 > Unity' 카테고리의 다른 글
| 유니티 쉐이더 - 평면의 양면 렌더링 (Double Sided Rendering) (1) | 2022.06.21 |
|---|---|
| 유니티 - 에디터 윈도우에서 블럭의 위치 Mapping 하기 (EditorWindow) (0) | 2022.06.20 |
| 유니티 - 2차원 배열 디버깅 : 커스텀 에디터로 인스펙터 수정하기 (Custom Editors) (0) | 2022.06.19 |
| 유니티 - 2차원 배열 디버깅 : 인스펙터에 보여주기 (2D Array in the Inspector) (0) | 2022.06.18 |
| 유니티 - OnGUI로 실시간 초당 프레임 수 확인하기 (FPS Status based on OnGUI) (0) | 2022.06.17 |


댓글