깃허브 데스크탑으로 프로젝트 관리하기 강의 오픈!! (인프런 바로가기)

참고
깃허브 액션으로 로또 번호를 수집해서 깃허브 리포지토리에 저장해 보자.
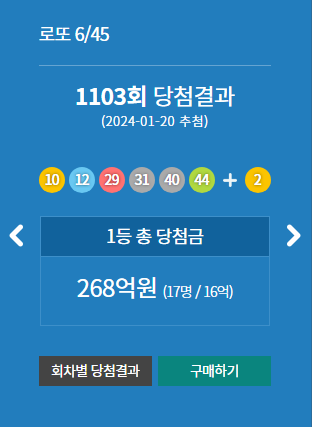
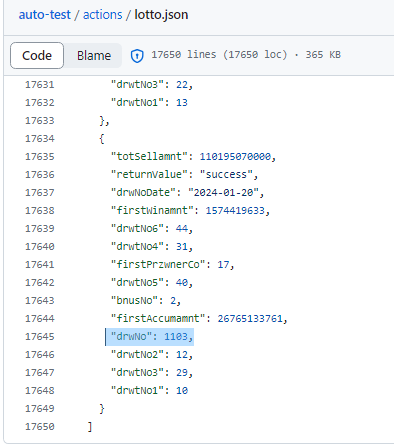
참고로 1103회 로또 번호는 다음과 같다.
로또 번호 API 사용하기
동행복권에서는 회차별 로또 번호에 대한 정보를 주는 API를 제공한다.
drwNo에 숫자를 넣으면 해당 회차별 번호를 알 수 있다.
https://www.dhlottery.co.kr/common.do?method=getLottoNumber&drwNo=${drwNo}
Node JS에서 아래 코드를 실행해 보자.
const axios = require("axios");

const getLottoNumber = async (drwNo) => {
  try {
    const response = await axios.get(
      `https://www.dhlottery.co.kr/common.do?method=getLottoNumber&drwNo=${drwNo}`
    );

    console.log(response.data);

    return response;
  } catch (e) {
    return undefined;
  }
};

getLottoNumber(1103);
얻은 정보는 다음과 같고, 순서가 조금 엉성하지만 실제 1103회차 정보와 일치한다.
{
  totSellamnt: 110195070000, // 총 상금
  returnValue: 'success',
  drwNoDate: '2024-01-20', // 로또 추첨 날짜
  firstWinamnt: 1574419633, // 1등 상금
  drwtNo6: 44, // 6번째 번호
  drwtNo4: 31, // 4번째 번호
  firstPrzwnerCo: 17, // 1등 당첨 인원
  drwtNo5: 40, // 5번째 번호
  bnusNo: 2, // 보너스 번호
  firstAccumamnt: 26765133761,
  drwNo: 1103, // 회차
  drwtNo2: 12, // 2번째 번호
  drwtNo3: 29, // 3번째 번호
  drwtNo1: 10 // 1번째 번호
}
json 생성
아래 코드를 실행해서 1회 ~ 1102회까지 정보를 json으로 만들자.
1103회부터는 깃허브 액션을 이용해 토요일마다 정보를 추가한다.
const fs = require("fs");
const axios = require("axios");

const getLottoNumber = async (drwNo) => {
  try {
    const response = await axios.get(
      `https://www.dhlottery.co.kr/common.do?method=getLottoNumber&drwNo=${drwNo}`
    );

    //console.log(response.data);
    return response.data;
  } catch (e) {
    return undefined;
  }
};

const makeLottoNumberJson = async (start, end) => {
  let lotto = [];
  for (let i = start; i <= end; i++) {
    let data = await getLottoNumber(i);
    lotto.push(data);
    await new Promise((resolve) => setTimeout(resolve, 500)); // 0.5초 딜레이
  }

  const json = JSON.stringify(lotto, null, 2);
  const filePath = "lotto.json";

  fs.writeFile(filePath, json, (err) => {
    if (err) {
      console.error("파일 쓰기 실패:", err);
    } else {
      console.log("파일에 JSON 데이터 저장 완료.");
    }
  });

  console.log(lotto);
};

makeLottoNumberJson(1, 1102);
주어진 경로에 lotto.json이 추가된 것을 알 수 있다.

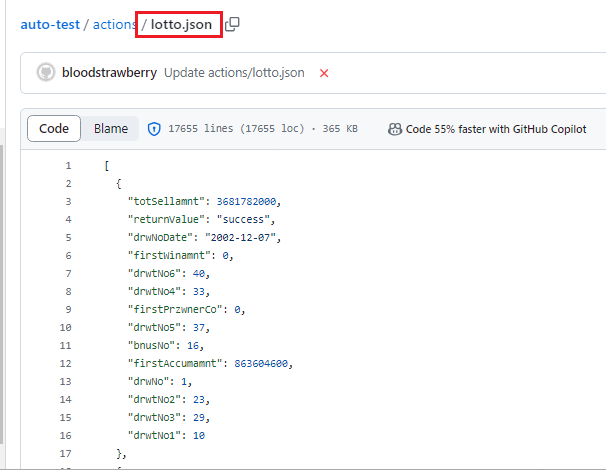
그리고 위의 lotto.json을 깃허브 리포지토리에 저장하자.

다음 회차 추가하기
다시 Node JS로 돌아와서 다음 코드를 실행해 보자.
해당 코드는 lotto.json의 파일을 읽어서 가장 최근 회차(이 글을 기준으로 1102회)에
다음 회차(= 1103회)를 추가하여 lotto.json을 업데이트한다. (RESTful API로 파일 쓰기 참고)
const fs = require("fs");
const axios = require("axios");
const fetch = require("node-fetch");

const { Octokit } = require("@octokit/core");

const octokit = new Octokit({
  auth: process.env.GH_TOKEN,
  request: {
    fetch: fetch,
  },
});

const getLottoNumber = async (drwNo) => {
  try {
    const response = await axios.get(
      `https://www.dhlottery.co.kr/common.do?method=getLottoNumber&drwNo=${drwNo}`
    );

    // console.log(response.data);
    return response.data;
  } catch (e) {
    return undefined;
  }
};

const getSHA = async (path) => {
  try {
    const result = await octokit.request(
      `GET /repos/bloodstrawberry/auto-test/contents/${path}`,
      {
        owner: "bloodstrawberry",
        repo: "auto-test",
        path,
      }
    );

    return result.data.sha;
  } catch (e) {
    console.log("error : ", e);
    return undefined;
  }
};

const fileWrite = async (path, contents) => {
  const currentSHA = await getSHA(path);
  const result = await octokit.request(
    `PUT /repos/bloodstrawberry/auto-test/contents/${path}`,
    {
      owner: "bloodstrawberry",
      repo: "auto-test",
      path,
      message: `Update ${path}`,
      sha: currentSHA,
      committer: {
        name: "bloodstrawberry",
        email: "bloodstrawberry@github.com",
      },
      content: `${btoa(contents)}`, // or `${Buffer.from(contents).toString("base64")}`,
      headers: {
        "X-GitHub-Api-Version": "2022-11-28",
      },
    }
  );

  return result.status;
};

const updateLottoJson = async () => {
  const filePath = "actions/lotto.json";

  try {
    const data = fs.readFileSync(filePath, "utf-8");
    const lottoJson = JSON.parse(data);
    const lastNumber = lottoJson[lottoJson.length - 1].drwNo;

    const latest = await getLottoNumber(lastNumber + 1); // 다음 회차 구하기

    lottoJson.push(latest);

    const updatedJson = JSON.stringify(lottoJson, null, 2);
    let response = await fileWrite(filePath, updatedJson);
    console.log(response);
  } catch (err) {
    console.error("error : ", err);
    process.exit(1);
  }
};

updateLottoJson();
참고로 실제 환경과 다르게 깃허브 액션 환경에서는 octokit에 fetch를 설정해야 한다. (v16 기준)
const fetch = require("node-fetch");

const { Octokit } = require("@octokit/core");

const octokit = new Octokit({
  auth: process.env.GH_TOKEN,
  request: {
    fetch: fetch,
  },
});
또한 yml에서 node-fetch를 설치할 때, 아래 버전을 설치해야 한다. (require 사용 가능한 node-fetch ver)
npm install node-fetch@2
이제 lotto.js를 리포지토리의 actions 폴더 아래에 추가하자.
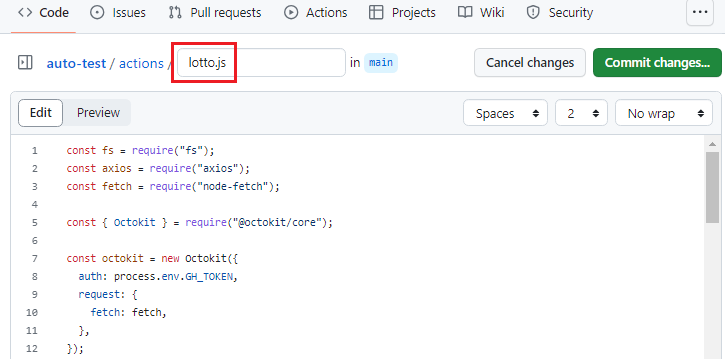
여기서 filePath는 실제 리포지토리의 경로로 변경해야 한다.
const filePath = "actions/lotto.json";토큰 획득하기
깃허브 API를 이용해서 lotto.js를 변경하기 때문에 토큰이 필요하다.
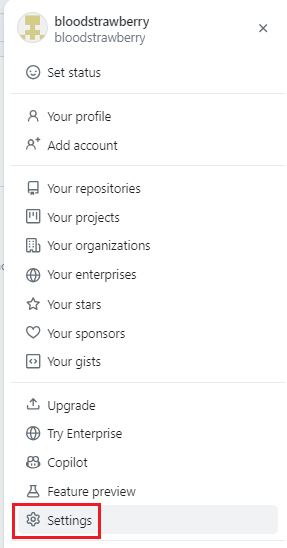
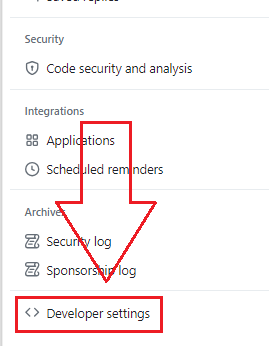
프로필 사진을 클릭해서 Settings로 이동하자.
왼쪽 아래 Developer settings로 이동하자.
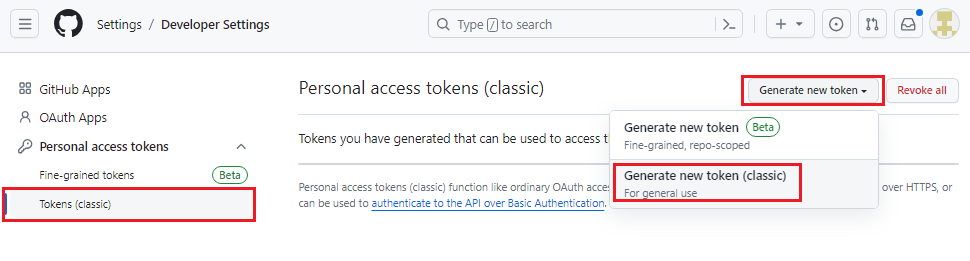
Tokens에서 Generate new token (classic)을 클릭한다.
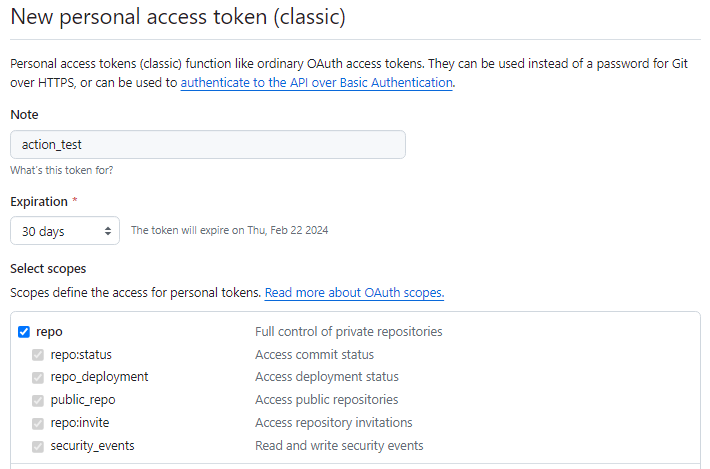
빈칸을 적당히 채운 후 토큰을 발급받는다.
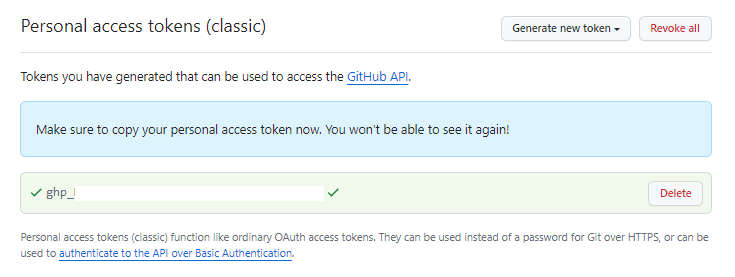
마지막으로 토큰을 복사한다.
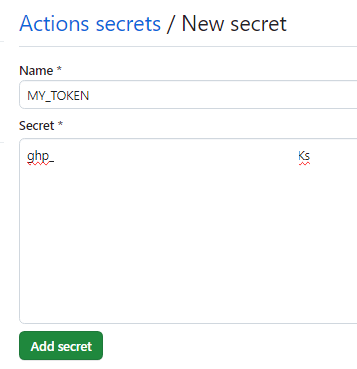
Secret에 토큰 등록하기
위에서 복사한 토큰을 리포지토리의 Secret에 등록해야 Aciton에서 환경 변수로 사용할 수 있다.
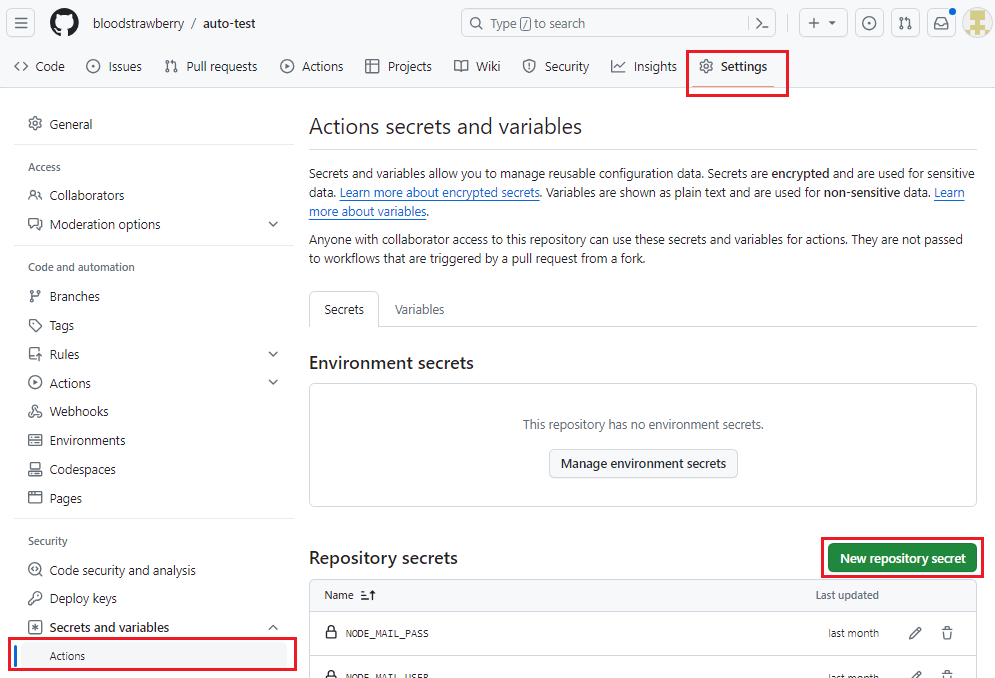
복사한 토큰을 붙여 넣고 Add secret을 클릭한다.
yml 파일 구현
이제 yml 파일을 작성한다.
테스트를 위해 10분 뒤에 파일이 실행되도록 하였다.
실제로 토요일 밤 10시에 실행하려면 '0 13 * * 6' 으로 설정하면 된다. (UTC 시간 13시 + 9시 → 한국 시간 22시)
name: Update Lotto File

on:
  schedule:
    - cron: '*/10 * * * *'
    # - cron: '0 13 * * 6' # 한국 시간으로 밤 10시 (22시) 토요일에 실행

jobs:
  update-lotto:
    runs-on: ubuntu-latest

    env:
      GH_TOKEN: ${{ secrets.MY_TOKEN }} # Secret에 등록한 Token을 환경 변수로 설정

    steps:
    - name: Checkout Repository
      uses: actions/checkout@v3

    - name: Set Up Node.js
      uses: actions/setup-node@v3
      with:
        node-version: '16'

    - name: Install Dependencies       # 필요한 library 설치
      run: |
        npm install axios
        npm install @octokit/rest
        npm install node-fetch@2

    - name: Run Node.js Script
      run: node actions/lotto.js
실제로 액션이 제대로 실행되는 것을 확인해 보자.
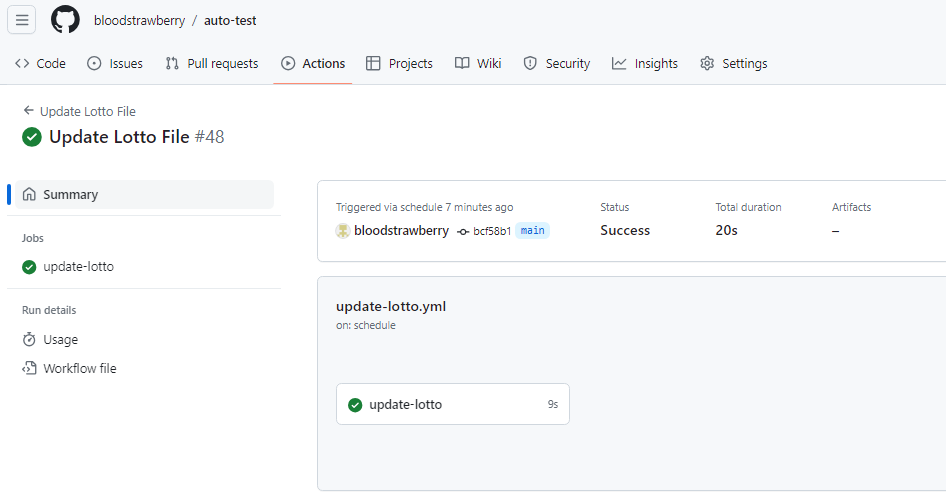
lotto.json에도 로또 번호 1103회 정보가 추가된 것을 확인해 보자
'개발 > Git, GitHub' 카테고리의 다른 글
| 깃허브 - 개인 토큰 발급 받기 (Personal access tokens) (0) | 2024.03.01 |
|---|---|
| 깃허브 머메이드 - 클래스 다이어그램 그리기 (Draw Class Diagram using GitHub Mermaid) (0) | 2024.01.27 |
| Git Bash - 윈도우 사용 중인 포트 강제 종료하기 (1) | 2024.01.14 |
| 깃허브 액션 - Schedule로 반복 작업하기 (1) | 2024.01.07 |
| 깃허브 액션 - Push 될 때 메일 보내기 (Send Email using GitHub Actions) (0) | 2023.12.16 |


댓글