유니티 - OpenGL로 화면에 선 그리기 (Draw a Line using Unity GL)
참고
OpenGL로 화면에 그림을 그리면 터치나 드래그가 제대로 반영되고 있는지 확인할 수 있다.
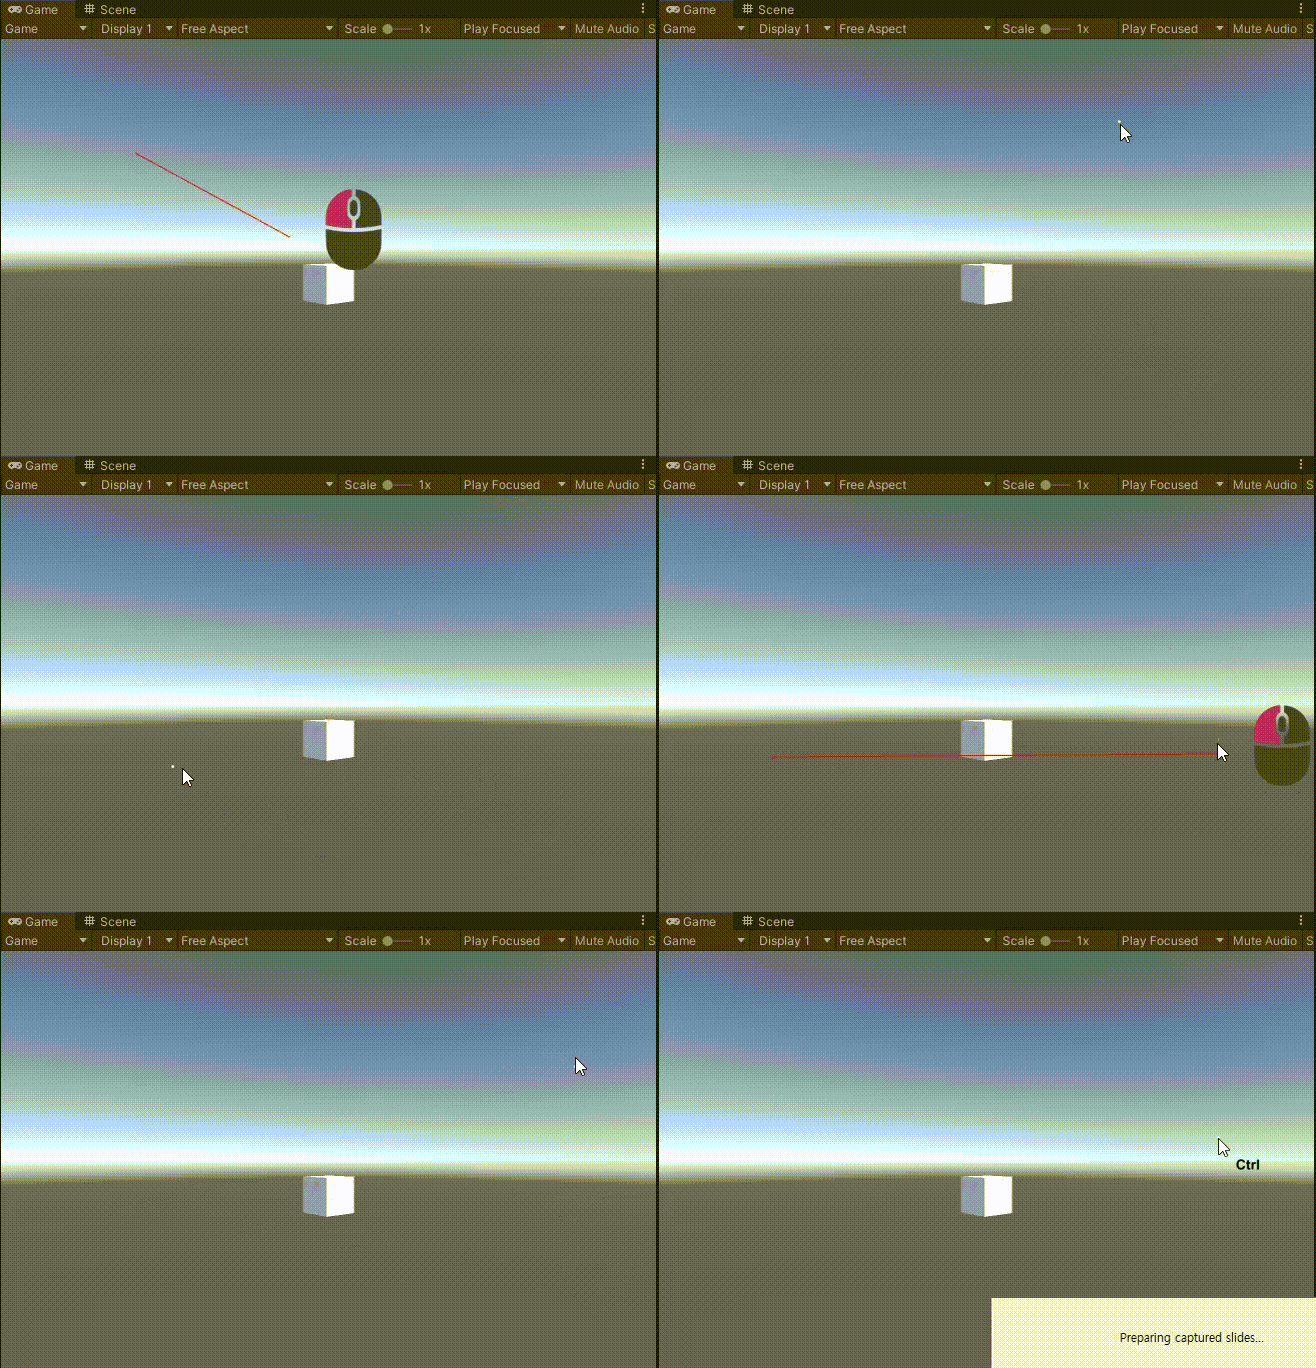
예를 들어 다음과 같이 최초로 클릭한 위치에서 마우스를 드래그한 위치까지 선을 그려보자.

touchFlag를 이용해 현재 화면을 클릭하고 있는지 감지한다.
ScreenToViewportPoint를 이용하면 화면의 위치를 (0, 0)에서 (1, 1)로 변환해준다.
touchFlag가 false인 상태에서 처음 입력된 위치를 startPos로 기억하였다.
    void Update()
    {
        if (Input.GetMouseButton(0))
        {
            Vector3 mousePos
                = new Vector3(Input.mousePosition.x, Input.mousePosition.y, -Camera.main.transform.position.z);

            touchPos = Camera.main.ScreenToViewportPoint(mousePos);

            if (touchFlag == false) startPos = touchPos;

            touchFlag = true;

            Debug.Log(touchPos);
        }
        else
        {
            touchFlag = false;
        }
    }
OpenGL을 사용하기 위한 설정은 링크를 참고하자.
    void Start()
    {
        mat = new Material(Shader.Find("Draw/Quads"));
    }
OnPostRender에서 touchFlag가 true인 경우에 선을 그린다.
따라서 GL.LINES와 색상을 설정한다.
GL.Begin(GL.LINES);
GL.Color(Color.red);
여기서 GL.LoadOrtho를 사용하면 화면을 (0, 0)에서 (1, 1)로 보게 된다.
touchPos를 ScreenToViewportPoint로 변환하였기 때문에 GL도 좌표를 같이 맞추었다.
GL.LoadOrtho();
예시 코드는 다음과 같다.
    void OnPostRender()
    {
        if (!mat)
        {
            Debug.LogError("Please Assign a material on the inspector");
            return;
        }

        if (touchFlag)
        {
            GL.PushMatrix();
            mat.SetPass(0);

            GL.LoadOrtho();

            GL.Begin(GL.LINES);
            GL.Color(Color.red);

            GL.Vertex3(startPos.x, startPos.y, 0);
            GL.Vertex3(touchPos.x, touchPos.y, 0);

            GL.End();
            GL.PopMatrix();
        }

    }
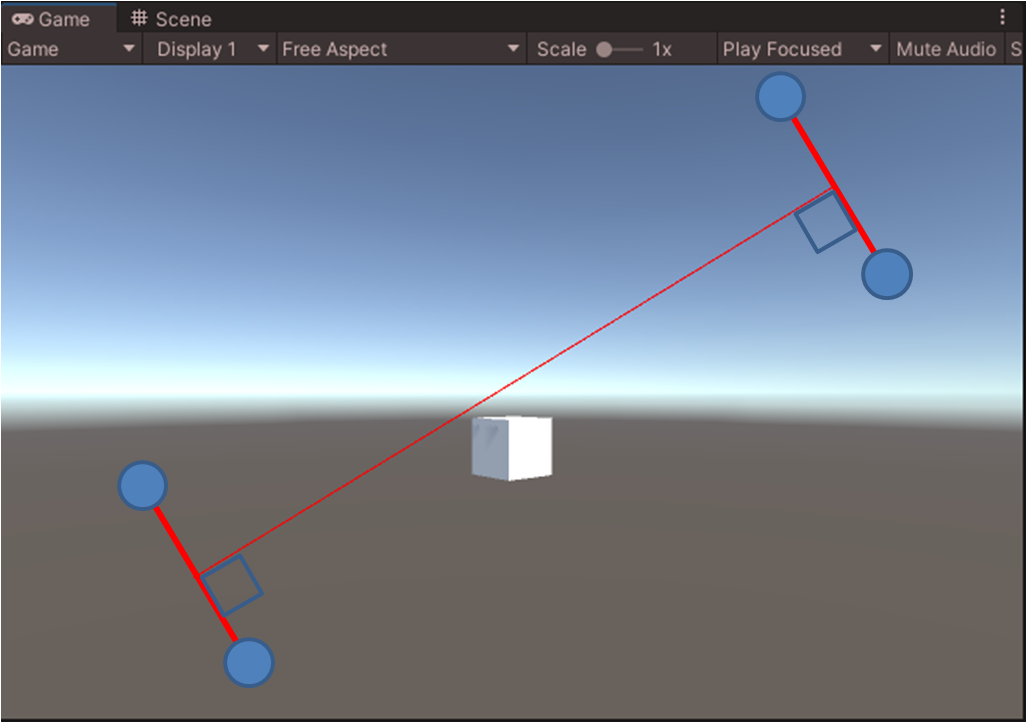
참고로 스크린 좌표는 다음과 같다.

OnPostRender는 카메라에서 동작하기 때문에 스크립트는 카메라가 있는 곳에 추가해야 한다.

게임을 실행하면 라인이 잘 그려지는 것을 알 수 있다.

전체 코드는 다음과 같다.
using System.Collections;
using System.Collections.Generic;
using UnityEngine;

public class MobileTouch : MonoBehaviour
{
    Material mat;
    bool touchFlag;
    Vector3 startPos, touchPos;

    void OnPostRender()
    {
        if (!mat)
        {
            Debug.LogError("Please Assign a material on the inspector");
            return;
        }

        if (touchFlag)
        {
            GL.PushMatrix();
            mat.SetPass(0);

            GL.LoadOrtho();

            GL.Begin(GL.LINES);
            GL.Color(Color.red);

            GL.Vertex3(startPos.x, startPos.y, 0);
            GL.Vertex3(touchPos.x, touchPos.y, 0);

            GL.End();
            GL.PopMatrix();
        }

    }

    void Start()
    {
        mat = new Material(Shader.Find("Draw/Quads"));
    }

    void Update()
    {
        if (Input.GetMouseButton(0))
        {
            Vector3 mousePos
                = new Vector3(Input.mousePosition.x, Input.mousePosition.y, -Camera.main.transform.position.z);

            touchPos = Camera.main.ScreenToViewportPoint(mousePos);

            if (touchFlag == false) startPos = touchPos;

            touchFlag = true;

            Debug.Log(touchPos);
        }
        else
        {
            touchFlag = false;
        }
    }
}
두께가 있는 라인 만들기
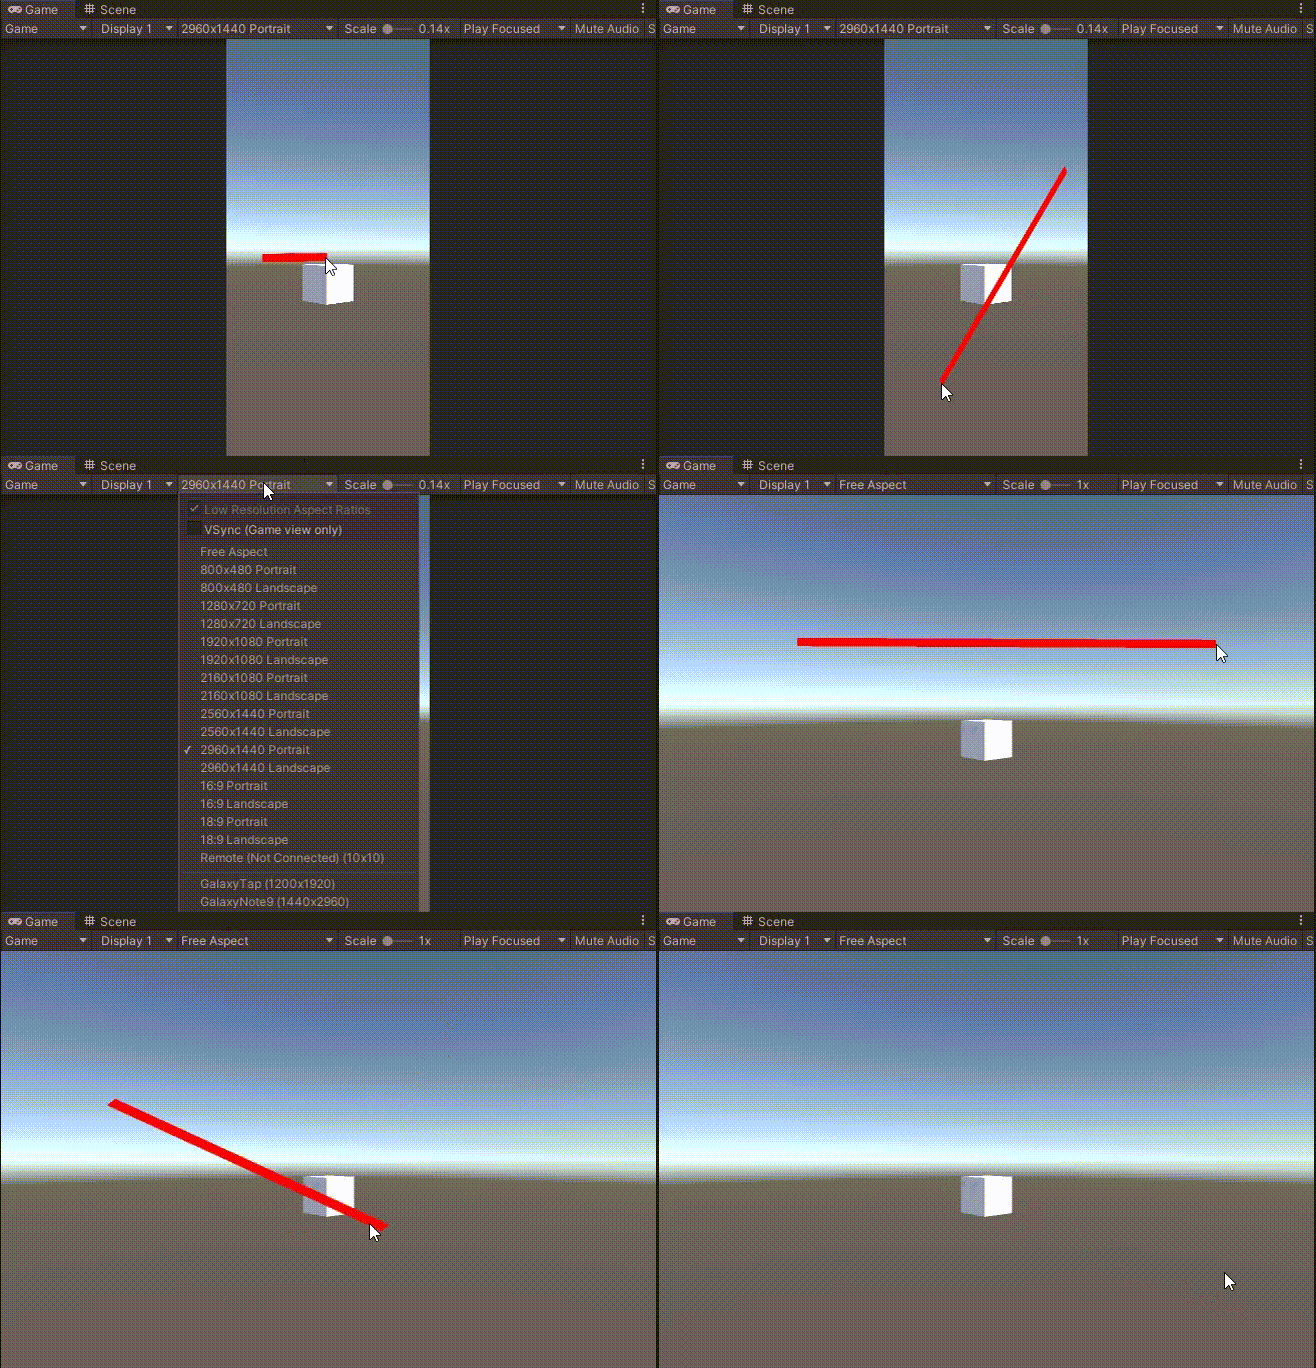
이제 해상도를 아래와 같이 변경해보자.

기본적으로 OpenGL의 Line은 1px이기 때문에 해상도가 클수록 선의 두께가 상대적으로 얇아진다.

OpenGL의 Line은 두께를 설정할 수 없기 때문에 사각형을 만들어서 사용한다.
먼저 두께에 대한 변수를 선언하자.
public float thickness = 0.01f;
그리고 GL.LINES를 GL.QUADS로 변경한다.
GL.Begin(GL.QUADS);
라인을 그린다면 이 라인을 90도 회전하고, thickness만큼 떨어진 점 4개를 구해서 사각형을 만들면 된다.
90도 회전은 쿼터니언의 AngleAxis를 이용하면 된다.

예시 코드는 다음과 같다.
GL.Begin(GL.QUADS);
GL.Color(Color.red);

Vector3 vec = touchPos - startPos;
Vector3 rot = (Quaternion.AngleAxis(90, new Vector3(0, 0, 1)) * vec).normalized * thickness;

GL.Vertex3(startPos.x - rot.x, startPos.y - rot.y, 0);
GL.Vertex3(startPos.x + rot.x, startPos.y + rot.y, 0);
GL.Vertex3(touchPos.x + rot.x, touchPos.y + rot.y, 0);
GL.Vertex3(touchPos.x - rot.x, touchPos.y - rot.y, 0);
게임을 실행하면 높은 해상도에서도 적절한 라인(사각형)이 그려지게 된다.

위의 결과를 그대로 안드로이드 apk에서 확인하려면 안드로이드 OpenGL 설정을 참고하자.
전체 코드는 다음과 같다.
using System.Collections;
using System.Collections.Generic;
using UnityEngine;

public class MobileTouch : MonoBehaviour
{
    Material mat;
    bool touchFlag;
    Vector3 startPos, touchPos;

    public float thickness = 0.01f;

    void OnPostRender()
    {
        if (!mat)
        {
            Debug.LogError("Please Assign a material on the inspector");
            return;
        }

        if (touchFlag)
        {
            GL.PushMatrix();
            mat.SetPass(0);

            GL.LoadOrtho();

            GL.Begin(GL.QUADS);
            GL.Color(Color.red);

            Vector3 vec = touchPos - startPos;
            Vector3 rot
                = (Quaternion.AngleAxis(90, new Vector3(0, 0, 1)) * vec).normalized * thickness;

            GL.Vertex3(startPos.x - rot.x, startPos.y - rot.y, 0);
            GL.Vertex3(startPos.x + rot.x, startPos.y + rot.y, 0);
            GL.Vertex3(touchPos.x + rot.x, touchPos.y + rot.y, 0);
            GL.Vertex3(touchPos.x - rot.x, touchPos.y - rot.y, 0);

            GL.End();
            GL.PopMatrix();
        }

    }

    void Start()
    {
        mat = new Material(Shader.Find("Draw/Quads"));
    }

    void Update()
    {
        if (Input.GetMouseButton(0))
        {
            Vector3 mousePos
                = new Vector3(Input.mousePosition.x, Input.mousePosition.y, -Camera.main.transform.position.z);

            touchPos = Camera.main.ScreenToViewportPoint(mousePos);

            if (touchFlag == false) startPos = touchPos;

            touchFlag = true;

            Debug.Log(touchPos);
        }
        else
        {
            touchFlag = false;
        }
    }
}
Unity Plus:
Easy 2D, 3D, VR, & AR software for cross-platform development of games and mobile apps. - Unity Store
Have a 2D, 3D, VR, or AR project that needs cross-platform functionality? We can help. Take a look at the easy-to-use Unity Plus real-time dev platform!
store.unity.com
Unity Pro:
Unity Pro
The complete solutions for professionals to create and operate.
unity.com
Unity 프리미엄 학습:
Unity Learn
Advance your Unity skills with live sessions and over 750 hours of on-demand learning content designed for creators at every skill level.
unity.com